Contenido relacionado
Revisiones y protocolos relacionados
Mark Elkins, Ruth Dentice | 28 febrero 2020
Sarah J Nevitt, Judith Thornton, Clare S Murray, Tiffany Dwyer | 1 mayo 2020
Peter Wark, Vanessa M McDonald, Sherie Smith | 14 junio 2023
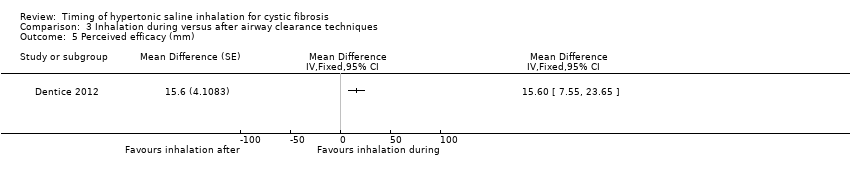
Ruth Dentice, Mark Elkins | 9 marzo 2021
Julian Tam, Edward F Nash, Felix Ratjen, Elizabeth Tullis, Anne Stephenson | 12 julio 2013
Lisa Morrison, Stephanie Milroy | 30 abril 2020
Ian M Balfour-Lynn, Karen Welch, Sherie Smith | 4 julio 2019
Elinor F Burrows, Kevin W Southern, Peadar G Noone | 9 abril 2014
Sherie Smith, Nicola J Rowbotham, Edward Charbek | 1 agosto 2022
Sherie Smith, Christopher T Edwards | 18 diciembre 2017