Methods for managing miscarriage: a network meta‐analysis
Information
- DOI:
- https://doi.org/10.1002/14651858.CD012602.pub2Copy DOI

- Database:
-
- Cochrane Database of Systematic Reviews
- Version published:
-
- 01 June 2021see what's new
- Type:
-
- Intervention
- Stage:
-
- Review
- Cochrane Editorial Group:
-
Cochrane Pregnancy and Childbirth Group
- Copyright:
-
- Copyright © 2021 The Cochrane Collaboration. Published by John Wiley & Sons, Ltd.
Article metrics
Altmetric:
Cited by:
Authors
Contributions of authors
Ioannis D Gallos (IDG) and Arri Coomarasamy (AC) conceived the idea for this review. IDG, AC, Malcolm J Price (MP), Aurelio Tobias (AT), Özge Tunçalp (OT), Antonella Lavelanet (AL) and A Metin Gülmezoglu (AMG) designed the meta‐analysis. Jayasish Ghosh (JG) designed the electronic data collection forms. JG, Hannah Jeffery (HJ) and IDG performed study selection. JG, Argyro Papadopoulou (AP), HJ, Adam Devall (AJD), Leanne Beeson (LB) and Vivian Do (VD) performed data extraction. JG performed the pairwise meta‐analysis. AT performed the network analysis. JG, AJD, AP and IDG graded the evidence and AP created the "summary of findings table". IDG created the protocol. JG and AJD drafted this review. IDG, AJD and AC edited and revised the review. All authors reviewed the manuscript prior to submission. AJD and IDG are the guarantors for this review.
Sources of support
Internal sources
-
Tommy's National Centre for Miscarriage Research, UK
External sources
-
National Institute for Health Research (NIHR), UK
This project was supported by the National Institute for Health Research (NIHR), via Cochrane Infrastructure funding to the Cochrane Pregnancy and Childbirth Group
Declarations of interest
Jay Ghosh: Grants and contracts ‐ this work is supported by Tommy's Charity who fund the Tommy's National Centre for Miscarriage Research, which is held by Prof Arri Coomarasamy. Work related to the topic of the review as health professional ‐ O&G Medical Doctor.
Argyro Papadopoulou: I am currently a PhD student at the University of Birmingham, UK. My tuition fees are paid by Tommy's charity.
Adam J Devall: co‐investigator for the MifeMiso trial now published in the Lancet, which was funded by the NIHR HTA programme. AJD did not participate in any decisions regarding this trial (i.e. assessment for inclusion/exclusion, trial quality, data extraction) for the purposes of this review or future updates, these tasks have been carried out by other members of the team who were not directly involved in the trial.
Hannah C Jeffery: none known.
Leanne E Beeson: co‐investigator for the MifeMiso trial now published in the Lancet, which was funded by the NIHR HTA programme. LEB did not participate in any decisions regarding this trial (i.e. assessment for inclusion/exclusion, trial quality, data extraction) for the purposes of this review or future updates, these tasks have been carried out by other members of the team who were not directly involved in the trial.
Vivian Do: none known.
Malcolm J Price:none known.
Aurelio Tobias: none known.
Özge Tunçalp: none known.
Antonella Lavelanet: I published work as a freelance writer. I am a board certified OBGYN, but I am currently not practicing and have not practiced for the last 4 years.
Ahmet Metin Gülmezoglu: none known.
Arri Coomarasamy: chief‐investigator for the MifeMiso trial now published in the Lancet, which was funded by the NIHR HTA programme. AC did not participate in any decisions regarding this trial (i.e. assessment for inclusion/exclusion, trial quality, data extraction) for the purposes of this review or future updates, these tasks have been carried out by other members of the team who were not directly involved in the trial.
Ioannis D Gallos: co‐investigator for the MifeMiso trial now published in the Lancet, which was funded by the NIHR HTA programme. IDG did not participate in any decisions regarding this trial (i.e. assessment for inclusion/exclusion, trial quality, data extraction) for the purposes of this review or future updates, these tasks have been carried out by other members of the team who were not directly involved in the trial.
Acknowledgements
As part of the pre‐publication editorial process, this review has been commented on by five peers (an editor, and one referee who is external to the editorial team), our Group's consumer editor, our Group's Statistical Adviser, Cochrane Methods and Cochrane Children and Families' Associate Editor. The review authors are grateful to the following peer reviewers for their time and comments: Dr Rui Wang, Department of Obstetrics and Gynaecology, Monash University, Australia.
This project was supported by the Tommy's National Centre for Miscarriage Research and the National Institute for Health Research (NIHR), via Cochrane Infrastructure funding to the Cochrane Pregnancy and Childbirth Group. The views and opinions expressed therein are those of the review authors and do not necessarily reflect those of the Systematic Reviews Programme, the NIHR, the NHS or the Department of Health and Social Care.
Malcolm J Price is supported by the NIHR Birmingham Biomedical Research Centre. The views expressed are those of the author(s) and not necessarily those of the NHS, NIHR or the Department of Health and Social Care.
The World Health Organization (WHO) and Jayasish Ghosh, Argyro Papadopoulou, Hannah Jeffery, Adam Devall, Leanne Beeson, Vivian Do, Malcolm J Price, Aurelio Tobias, A Metin Gülmezoglu, Arri Coomarasamy, Ioannis D Gallos, retain copyright and all other rights in their respective contributions to the manuscript of this Cochrane Review as submitted for publication.
Version history
| Published | Title | Stage | Authors | Version |
| 2021 Jun 01 | Methods for managing miscarriage: a network meta‐analysis | Review | Jay Ghosh, Argyro Papadopoulou, Adam J Devall, Hannah C Jeffery, Leanne E Beeson, Vivian Do, Malcolm J Price, Aurelio Tobias, Özge Tunçalp, Antonella Lavelanet, Ahmet Metin Gülmezoglu, Arri Coomarasamy, Ioannis D Gallos | |
| 2017 Mar 23 | Methods for managing miscarriage: a network meta‐analysis | Protocol | Ioannis D Gallos, Helen M Williams, Malcolm J Price, Abey Eapen, Mary M Eyo, Aurelio Tobias, Jonathan J Deeks, Özge Tunçalp, A Metin Gülmezoglu, Arri Coomarasamy | |
Differences between protocol and review
There are some differences between the published protocol for this review (Gallos 2017) and the full review, these are listed below.
Methods/ criteria for considering studies for this review/ types of interventions
The protocol stated the following methods.
We will include the following interventions: dilatation plus sharp curettage, suction curettage, suction curettage with cervical preparation, misoprostol alone, and mifepristone plus misoprostol versus expectant management or placebo.
Instead of dilatation plus sharp curettage we have named this intervention dilatation and curettage. Instead of suction curettage we have named this intervention suction aspiration. Instead of suction curettage with cervical preparation we have named this intervention suction aspiration plus cervical preparation.
We had also planned to include comparisons between different routes of administration of medical treatment (e.g. oral versus vaginal), or between different drugs or doses of drug, or duration or timing of treatment which would have been part of a subgroup analysis. This was not performed as there was significant heterogeneity between the different misoprostol arms present in the trials however this may be examined in a future separate review. We had planned to include a sensitivity analysis to assess different effect measures (risk ratio versus odds ratio), however this was not done because different effect measures cannot be combined in one analysis. We had planned to include a sensitivity analysis to assess use of fixed‐effect versus random‐effects model, however since fixed effects should only be used in the absence of heterogeneity, this was not done. We have added 'exclusion of quasi‐randomised trials' to the planned sensitivity analysis in the methods section. We had also aimed to compare cervical preparation drugs with each other and compare different doses, routes and regimens of the same drug with each other in a subgroup analysis however sufficient data did not exist.
Methods/ data synthesis/ methods for direct treatment comparisons
The protocol stated the following.
We will perform standard pairwise meta‐analyses using a random‐effects model in the presence of substantial heterogeneity or fixed‐effect model in STATA for every treatment comparison.
We performed standard pairwise meta‐analyses in Review Manager 5.4 and STATA.
Methods/ subgroup analysis and investigation of heterogeneity
The protocol in this section stated the following.
If we find important heterogeneity or inconsistency, or both, we will explore the possible sources. If sufficient studies are available, we will perform subgroup analyses by using the following effect modifiers:
-
gestational age ( nine weeks versus > nine weeks of gestation);
-
type of miscarriage (incomplete versus missed miscarriage);
-
type of vacuum aspiration device used (electrical versus manual vacuum aspiration);
-
type of healthcare setting (inpatient versus outpatient);
-
dosage, regimen, and route of drug administration (sublingual, rectal, oral).
We will assess subgroup differences by evaluating the relative effects and assessment of model fit for the primary outcomes.
Sufficient studies were not available for subgroup analysis of gestational age, type of vacuum aspiration device used and dosage, regimen, and route of drug administration (sublingual, rectal, oral). The detail in the study characteristics of included studies was not sufficient enough, in order to perform the subgroup analysis of type of healthcare setting.
Methods/ sensitivity analysis
The protocol in this section stated the following.
For the primary outcomes we will perform sensitivity analysis for the following:
-
overall risk of bias of the studies (low versus high risk of overall bias);
-
randomisation unit (cluster versus individual);
-
different effect measures (risk ratio versus odds ratio);
-
use of fixed‐effect versus random‐effects model;
-
use of placebo versus expectant management
We will assess differences by evaluating the relative effects and assessment of model fit.
There were no cluster‐randomised trials included to allow us to perform a sensitivity analysis based on randomisation unit. Other planned sensitivity analyses were performed but no differences were detected in terms of the overall results.
Keywords
MeSH
Medical Subject Headings (MeSH) Keywords
- Abortion, Incomplete [therapy];
- Abortion, Missed [therapy];
- Abortion, Spontaneous [*therapy];
- Drug Therapy, Combination;
- Mifepristone [administration & dosage];
- Misoprostol [administration & dosage];
- Network Meta-Analysis;
- Oxytocics [administration & dosage];
- Placebos [administration & dosage];
- *Pregnancy Trimester, First;
- Randomized Controlled Trials as Topic;
- Suction [statistics & numerical data];
- Vacuum Curettage [statistics & numerical data];
- Watchful Waiting [statistics & numerical data];
Medical Subject Headings Check Words
Female; Humans; Pregnancy;
PICOs

Risk of bias graph: review authors' judgements about each risk of bias item presented as percentages across all included studies.

Risk of bias summary: review authors' judgements about each risk of bias item for each included study.
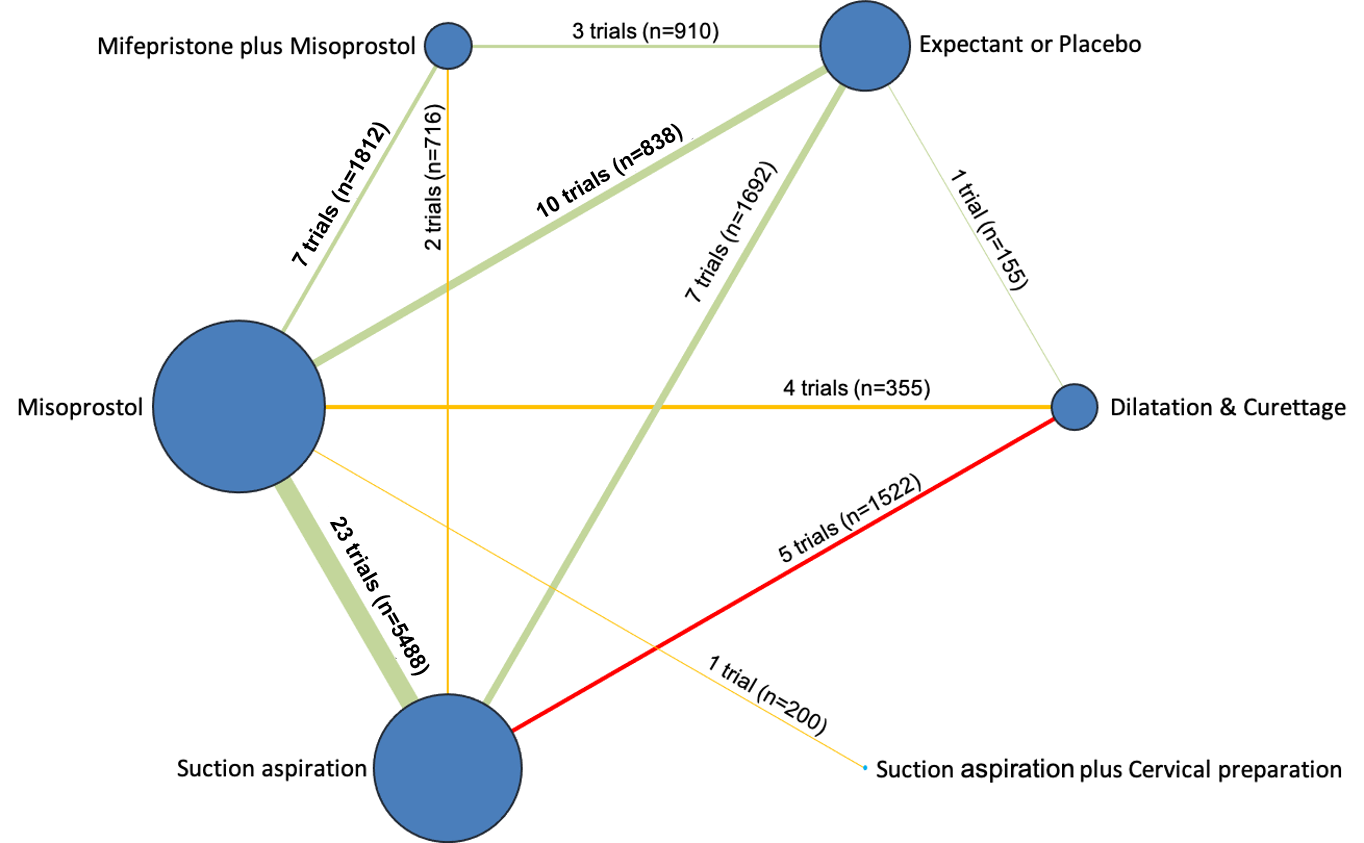
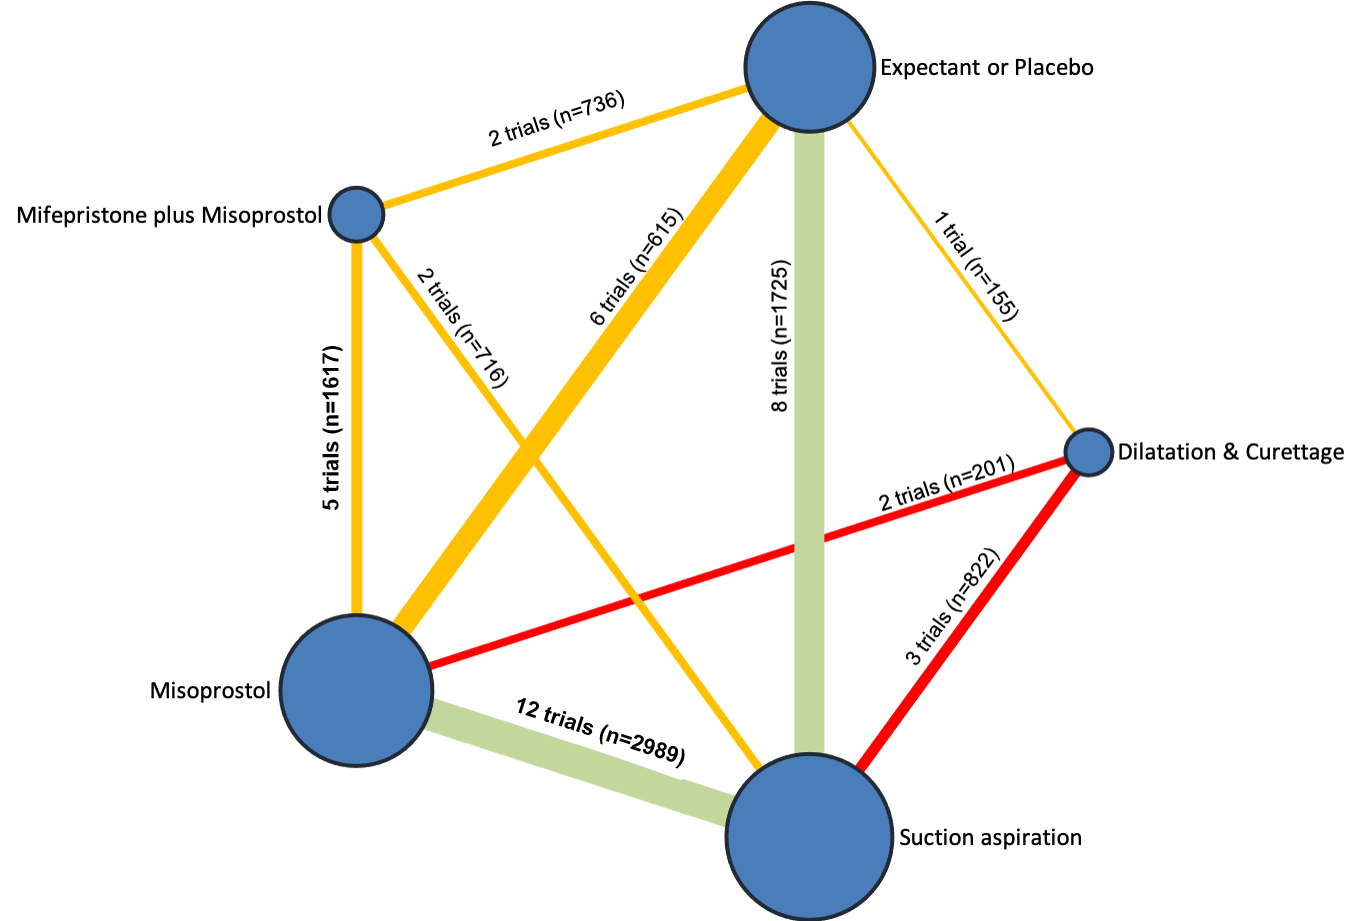
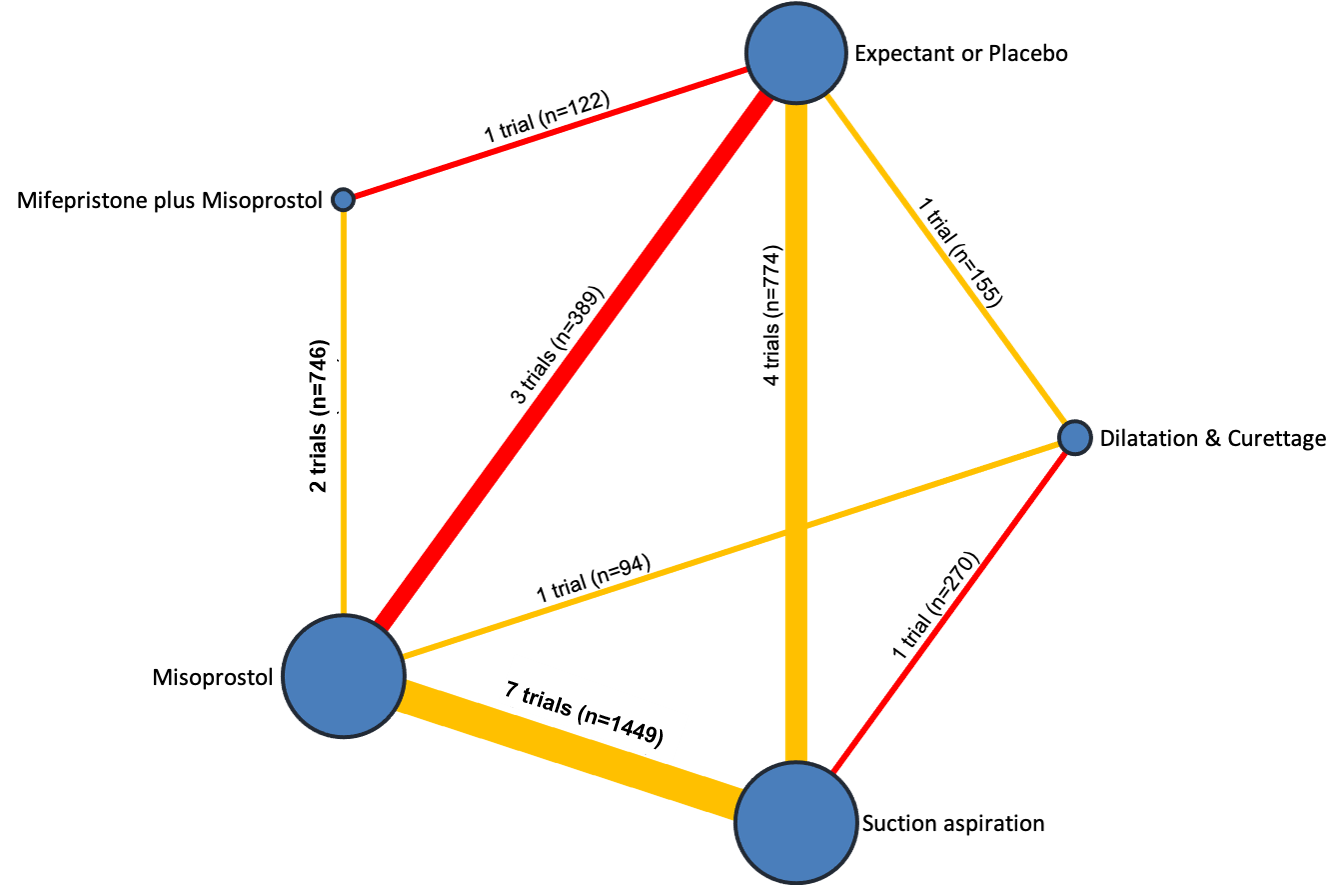
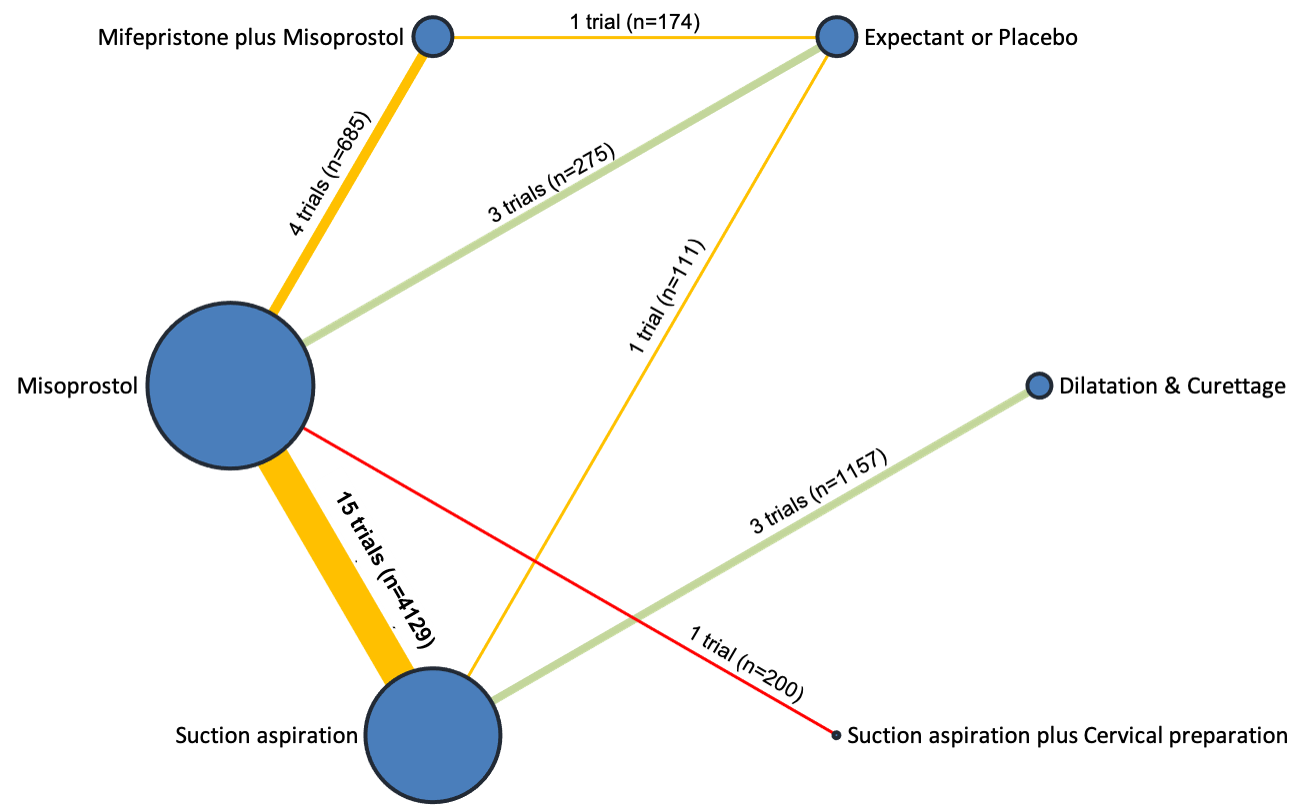
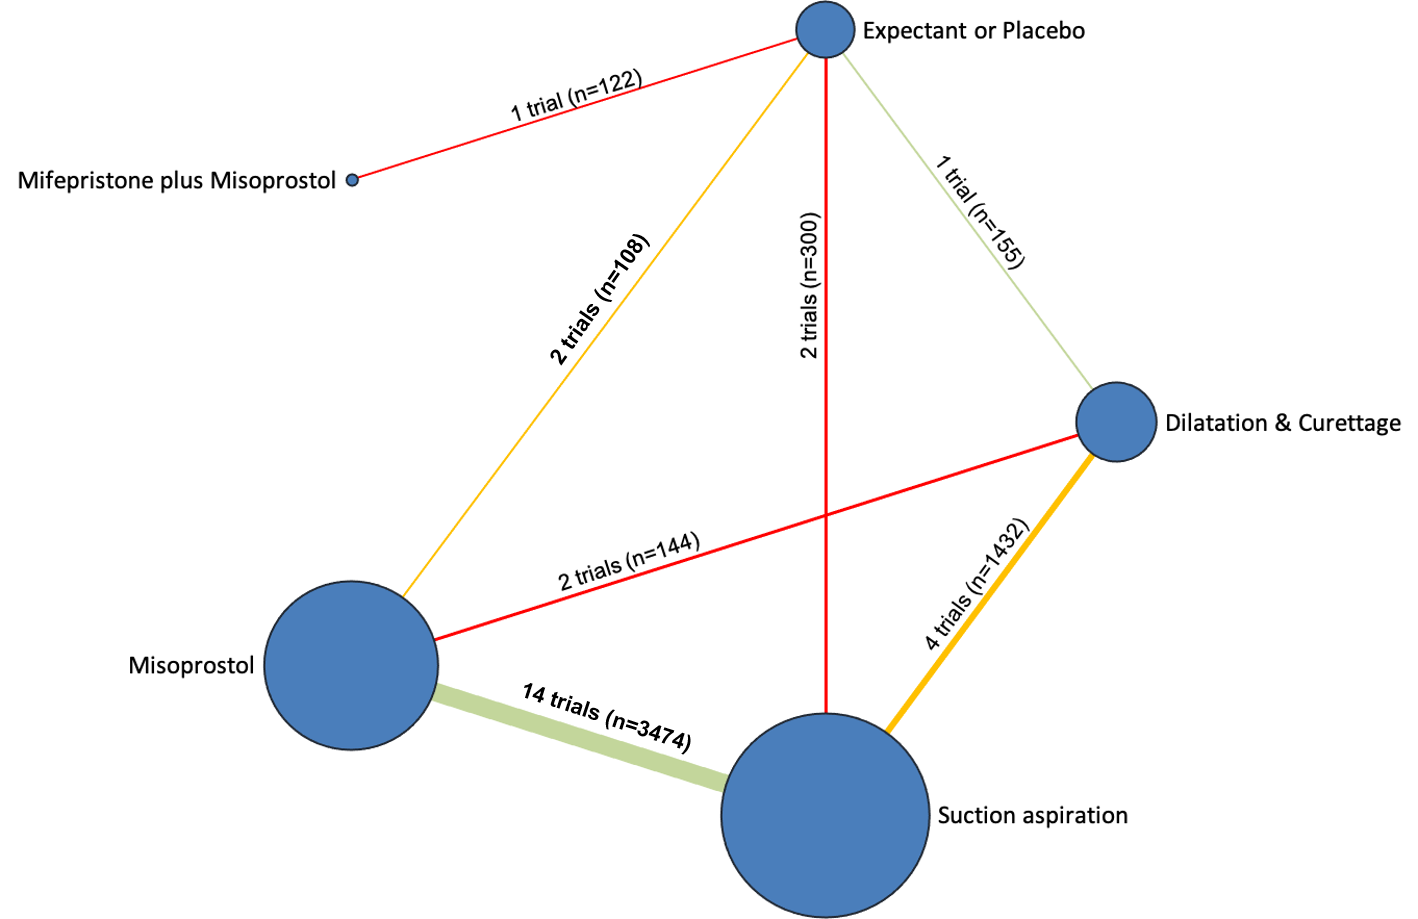
Network diagram for outcome of complete miscarriage. The nodes represent an intervention and their size is proportional to the number of trials comparing this intervention to any other in the network. The lines connecting each pair of interventions represent a direct comparison and are drawn proportional to the number of trials making each direct comparison. Numbers on the lines represent the number of trials and participants for each comparison. The colour of the line is green for high‐certainty evidence; light green for moderate‐certainty evidence; orange for low‐certainty evidence and red for very low‐certainty evidence. Multi‐arm trials contribute to more than one comparison.
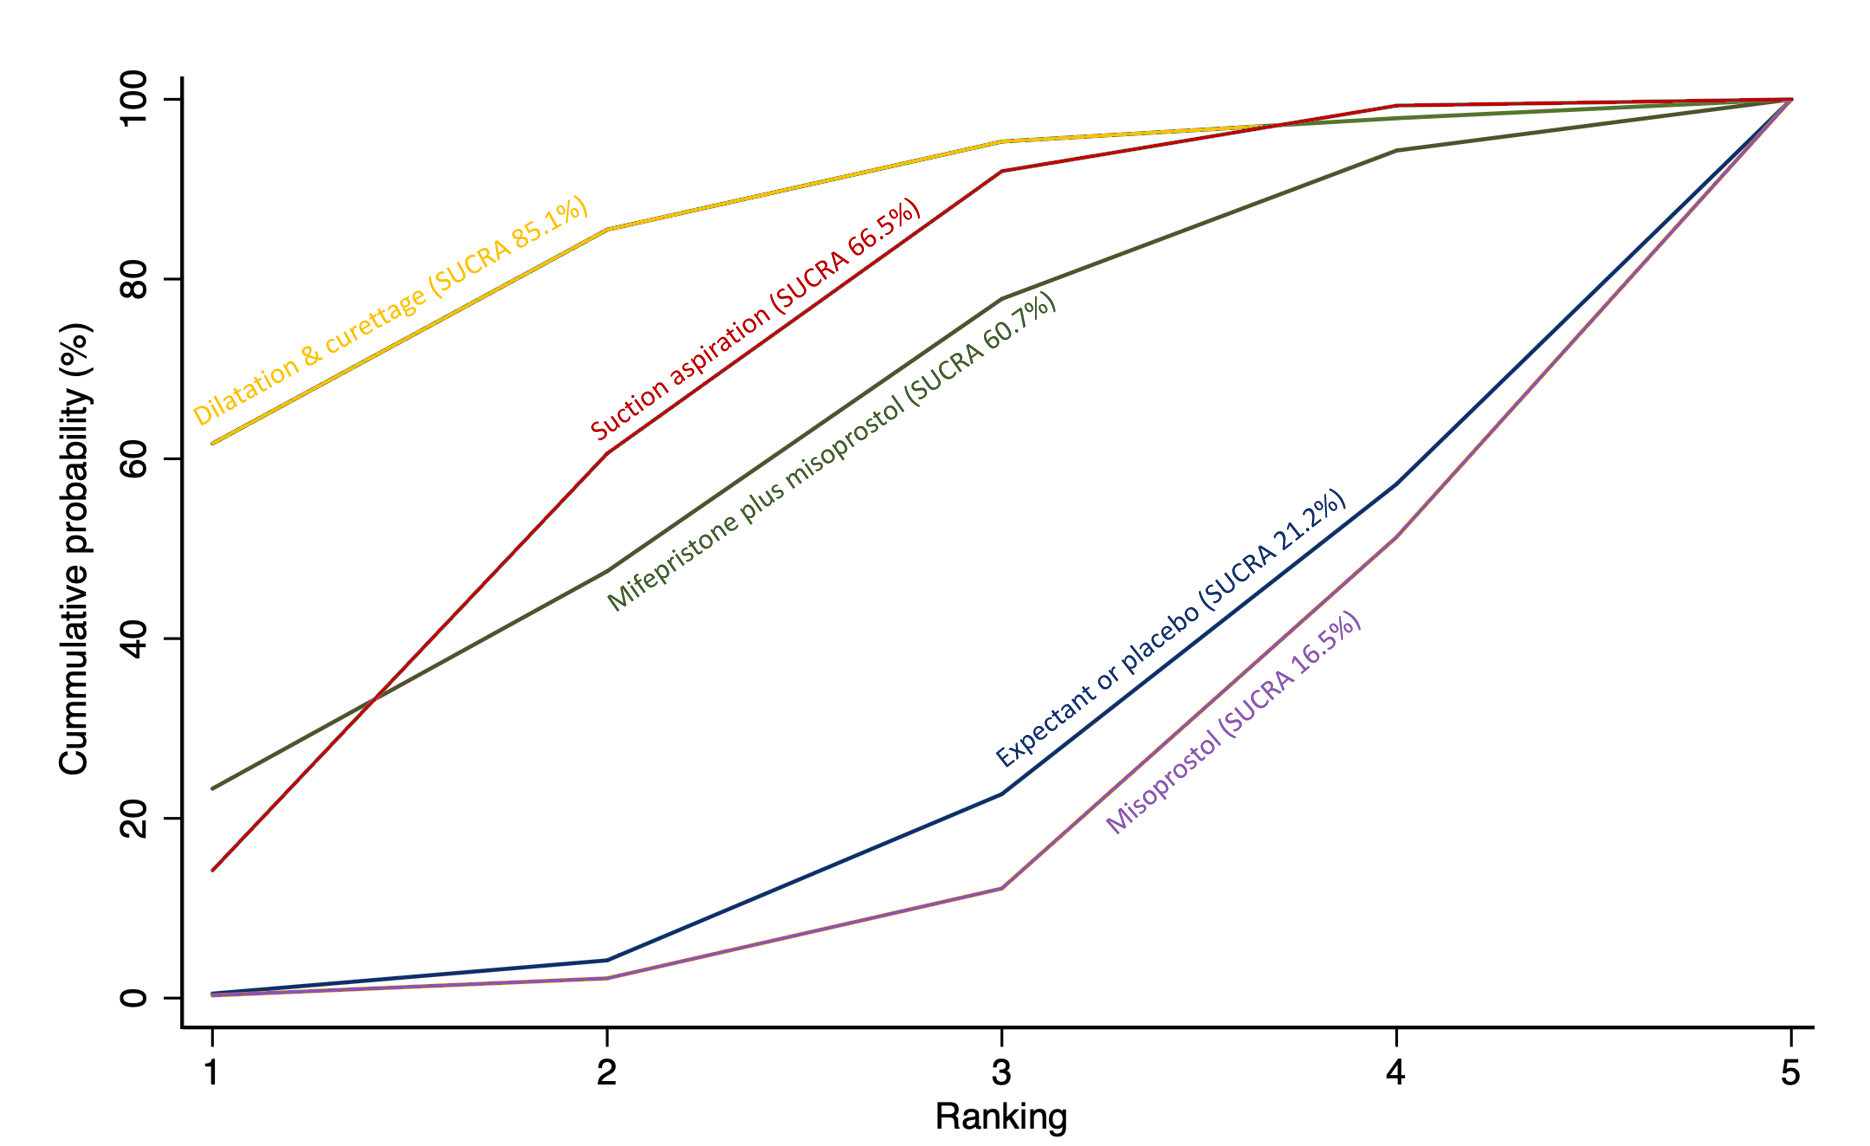
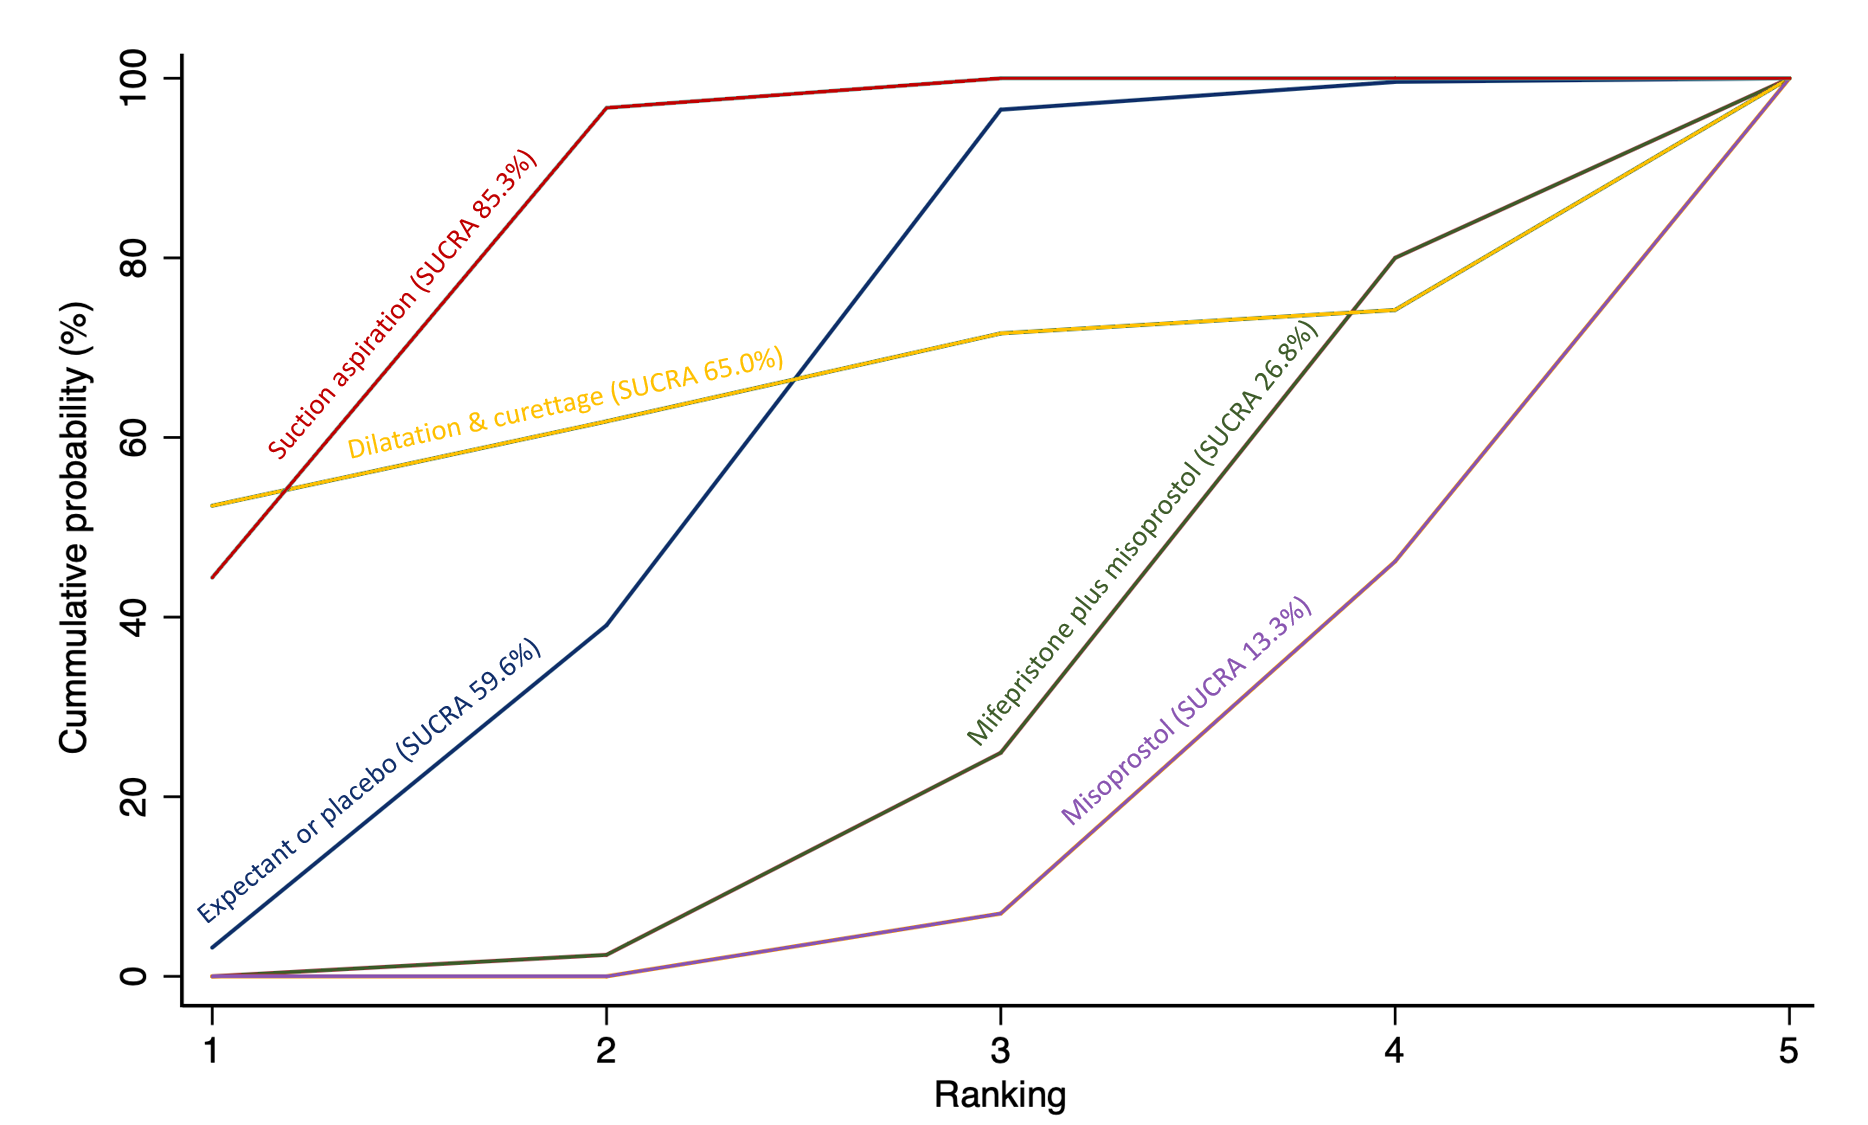
Cumulative rankogram comparing each of the methods of management of a miscarriage for incomplete miscarriage subgroup analysis for the outcome of complete miscarriage. Ranking indicates the cumulative probability of being the best method, the second best, the third best, etc. The x axis shows the relative ranking and the y‐axis the cumulative probability of each ranking. We estimate the SUrface underneath this Cumulative RAnking line (SUCRA); the larger the SUCRA the higher its rank among all available methods.
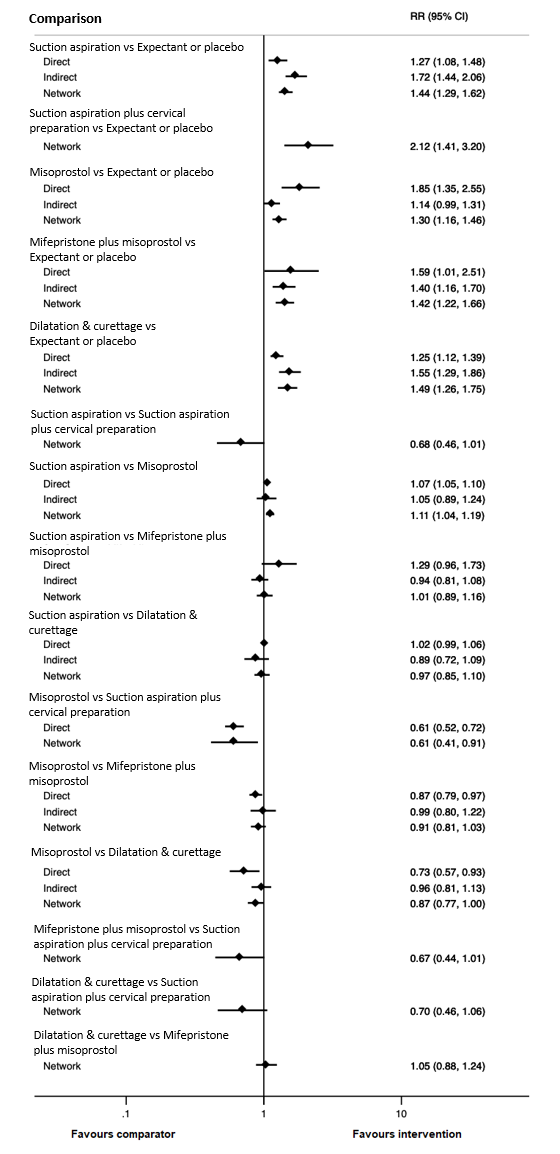
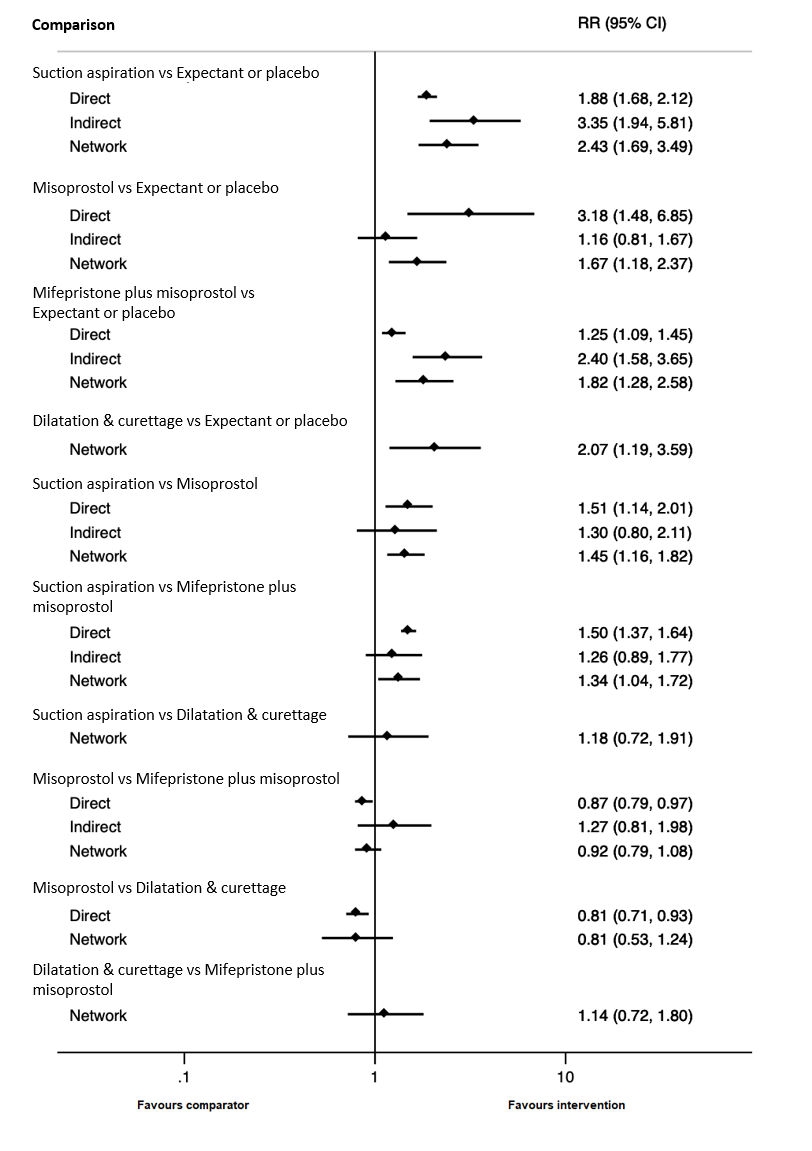
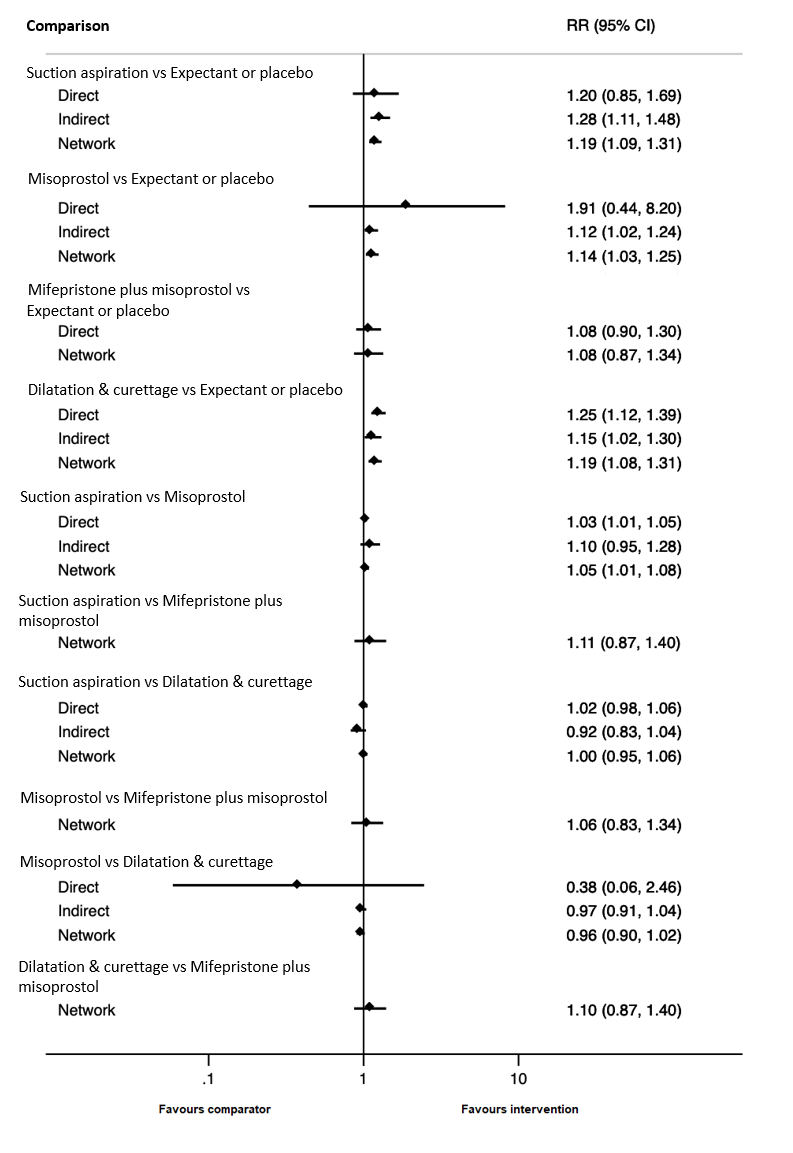
Forest plot with relative risk ratios and 95% CIs from pairwise, indirect and network (combining direct and indirect) analyses for outcome of complete miscarriage.

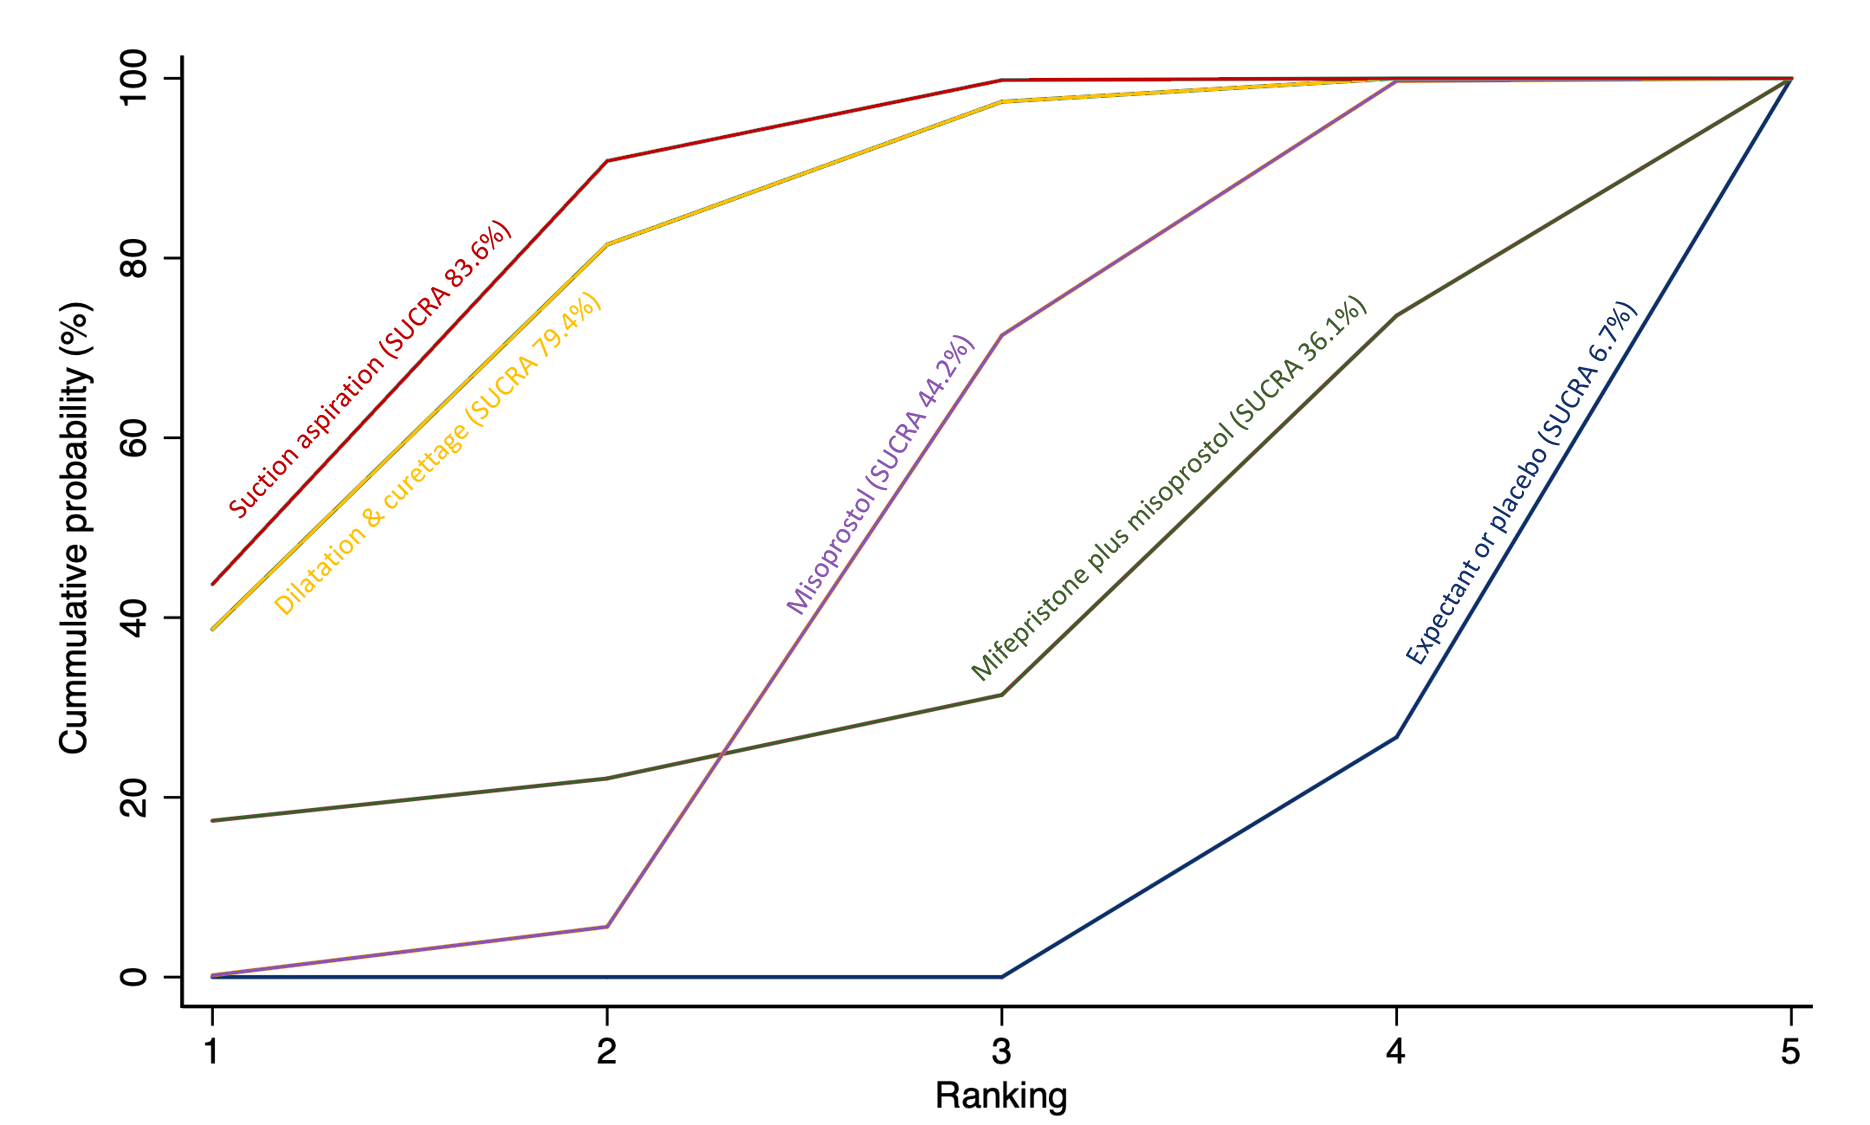
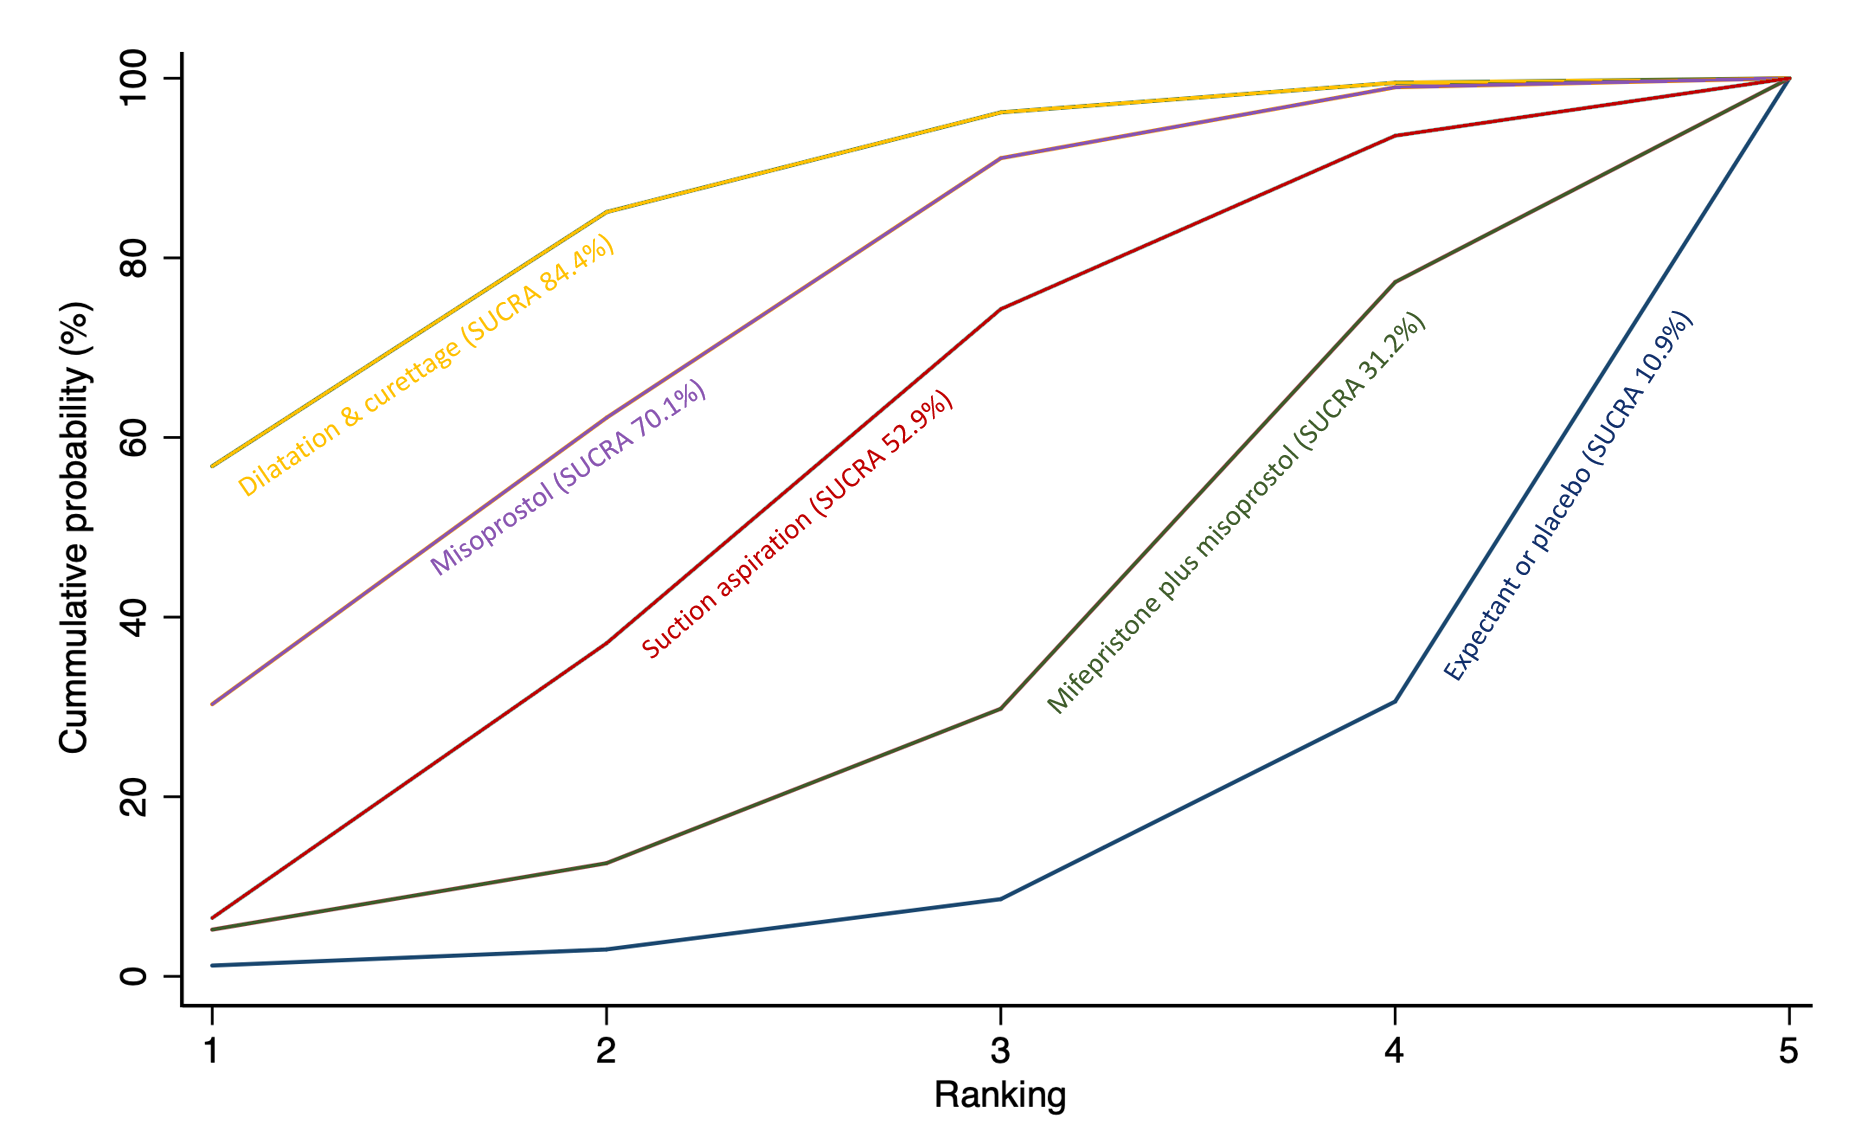
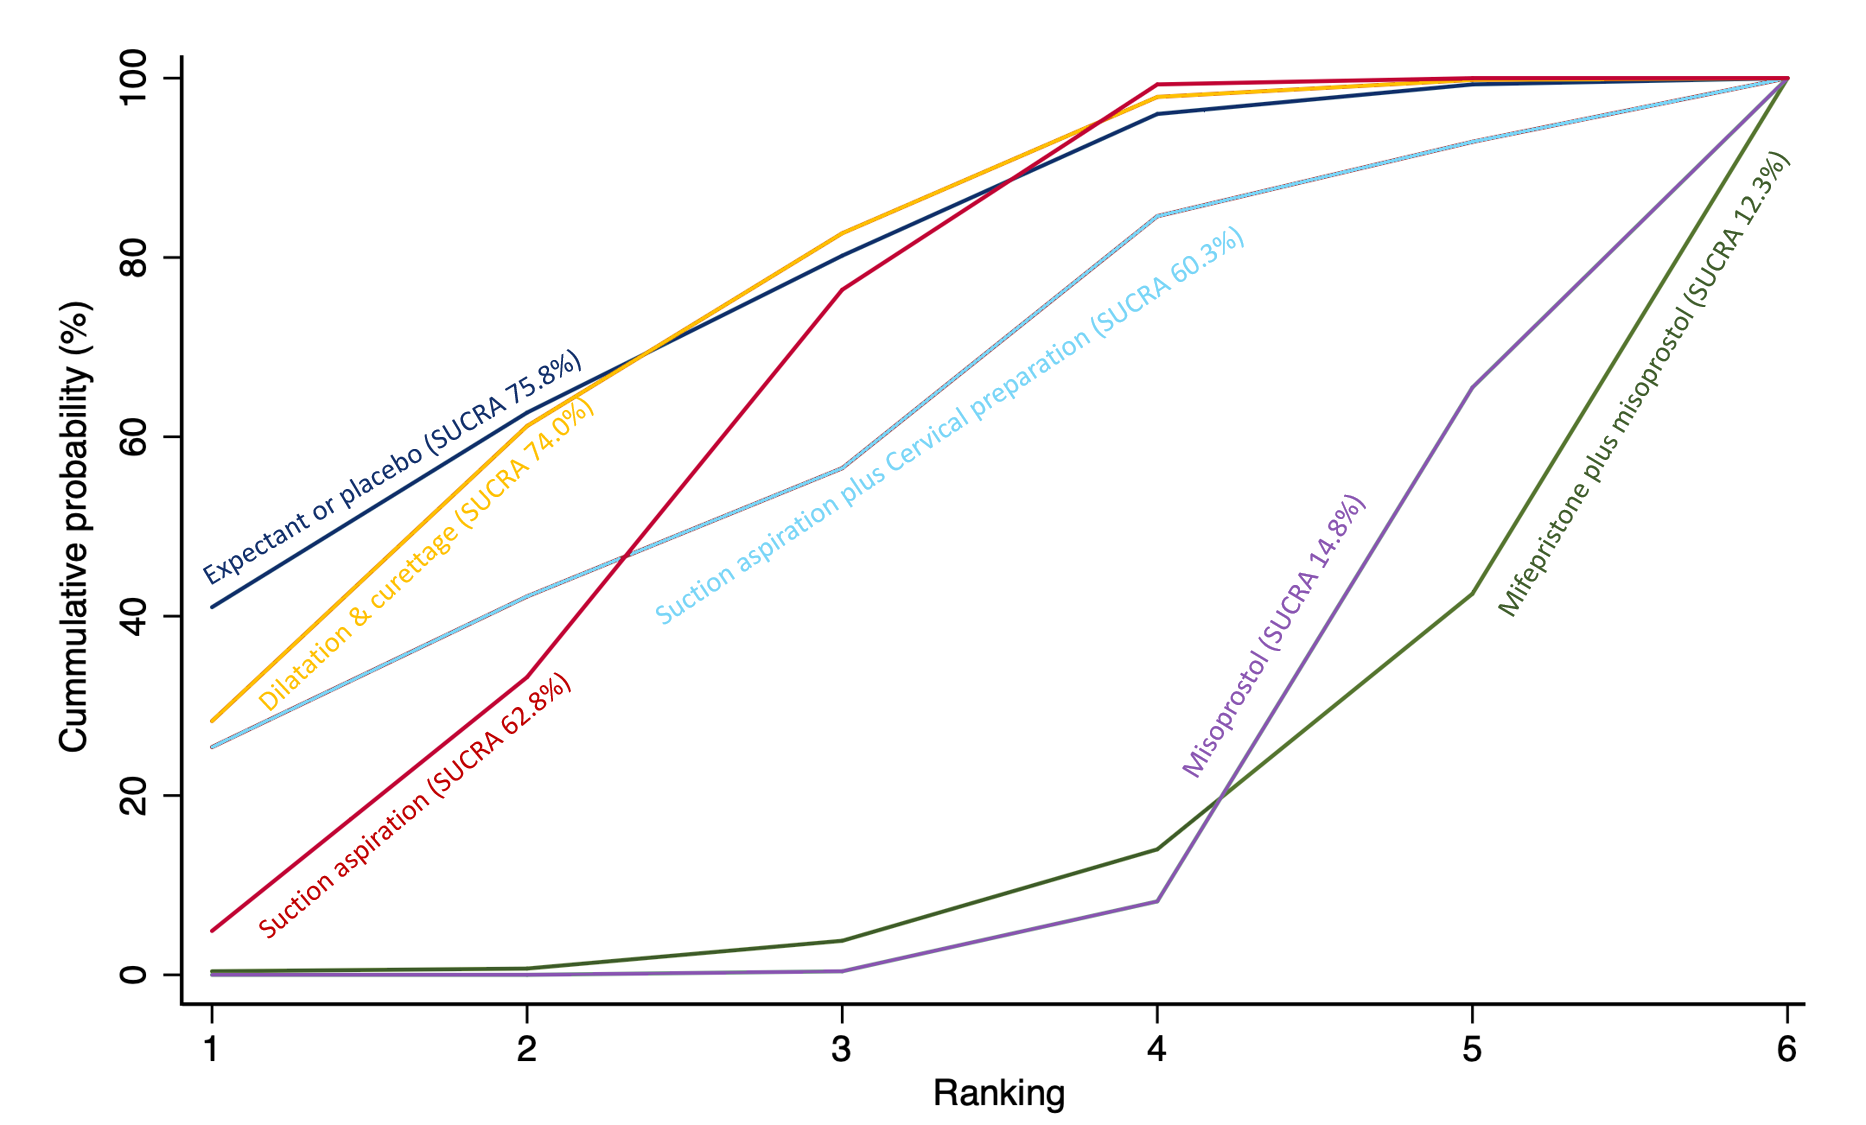
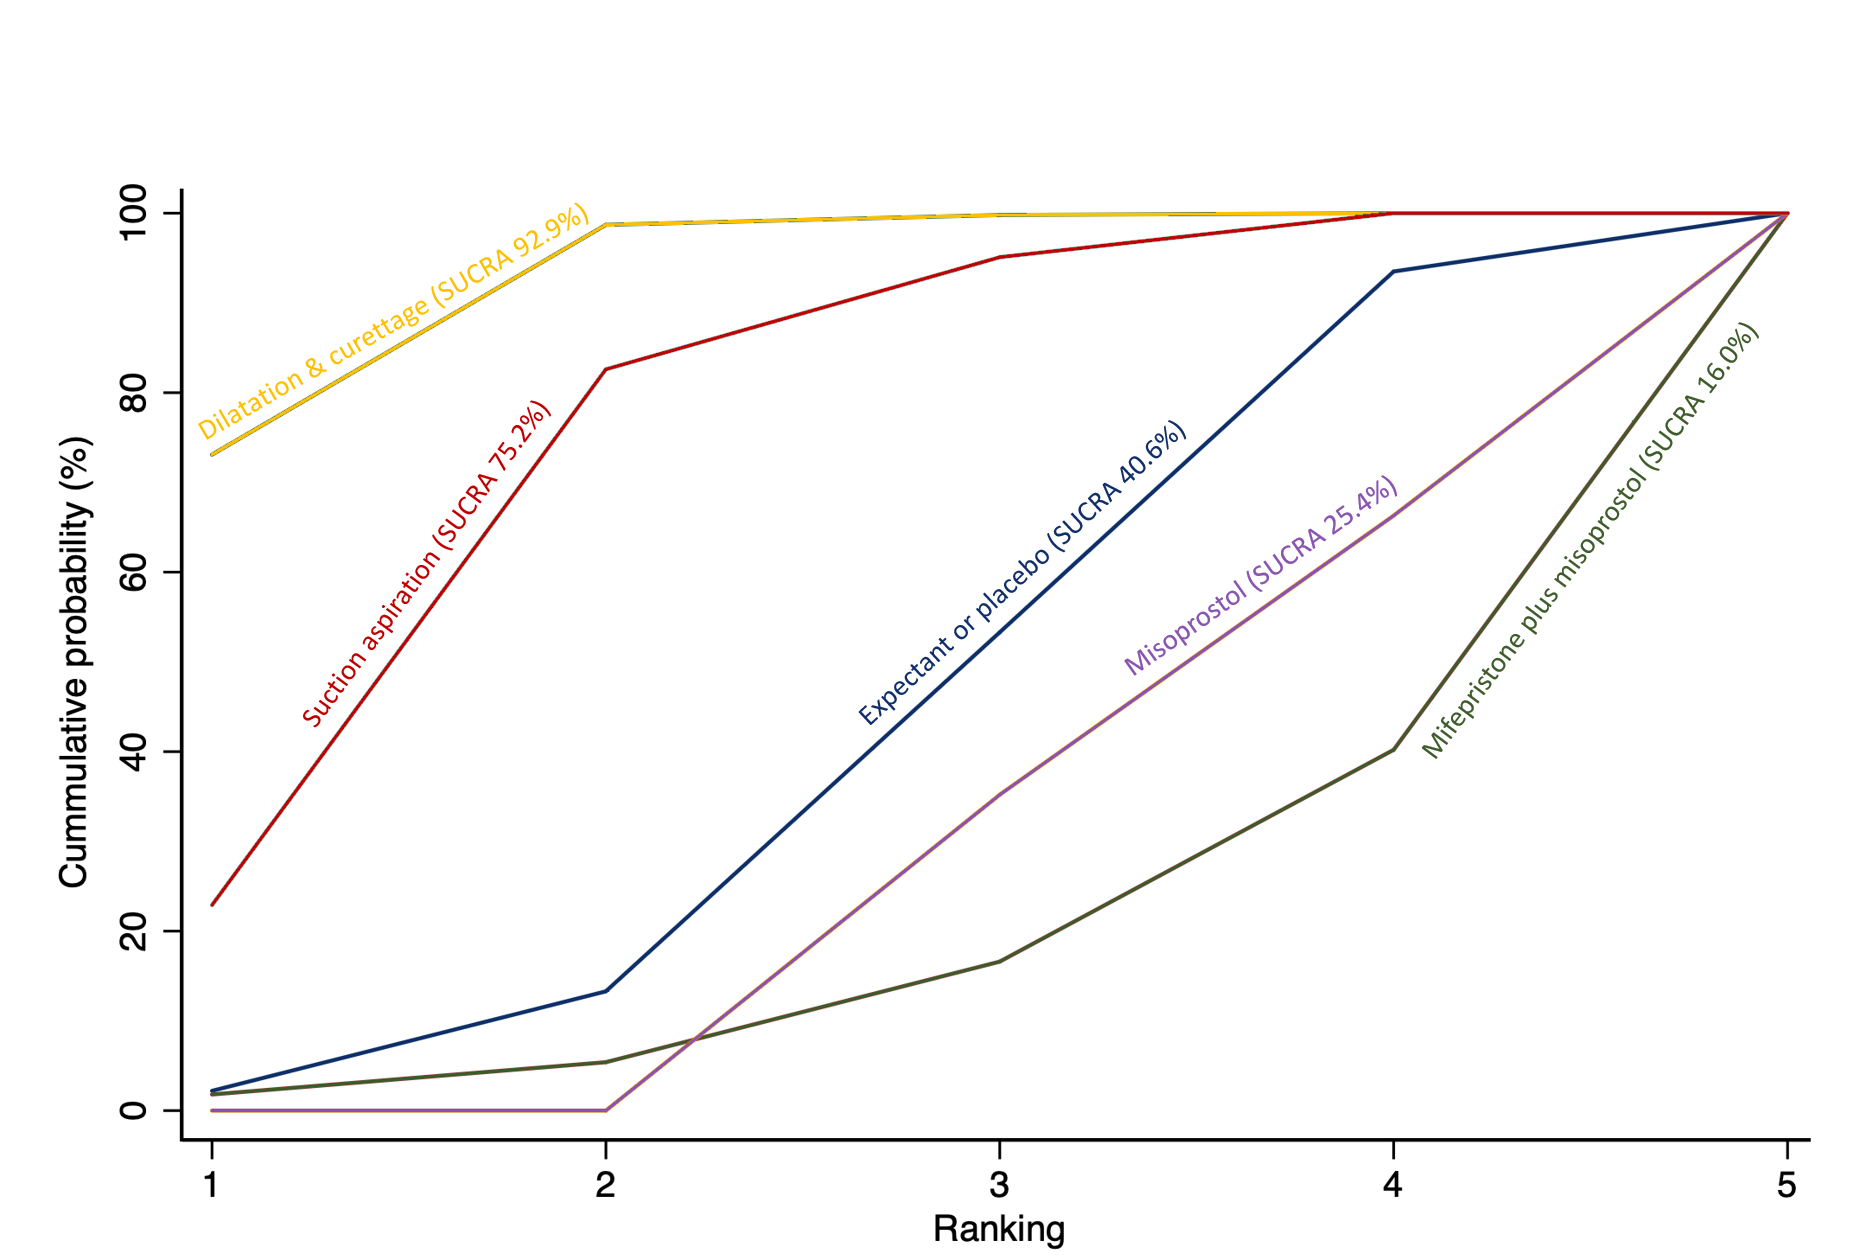
Cumulative rankogram comparing each of the methods of management of a miscarriage for the outcome of complete miscarriage. Ranking indicates the cumulative probability of being the best method, the second best, the third best, etc. The x axis shows the relative ranking and the y‐axis the cumulative probability of each ranking. We estimate the SUrface underneath this Cumulative RAnking line (SUCRA); the larger the SUCRA the higher its rank among all available methods.

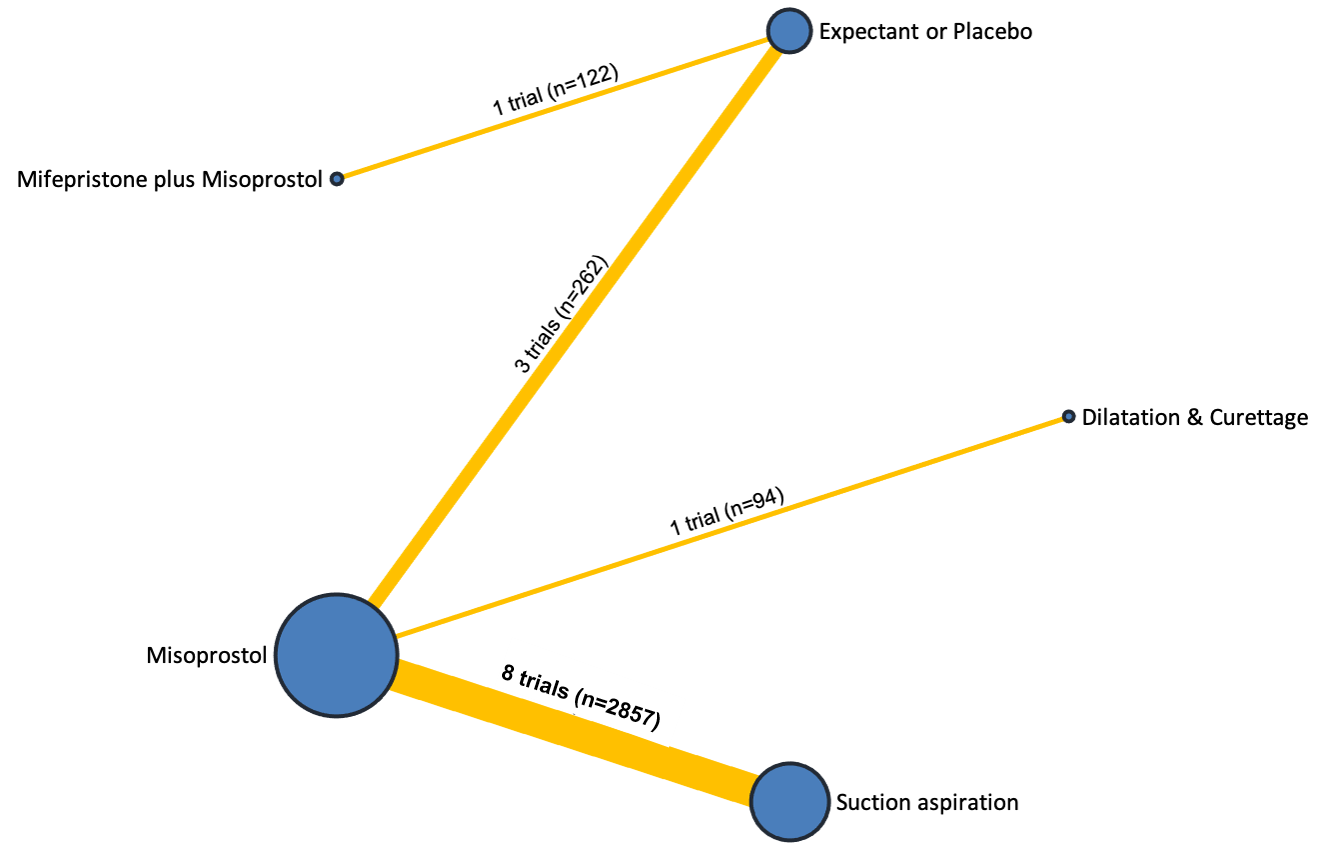
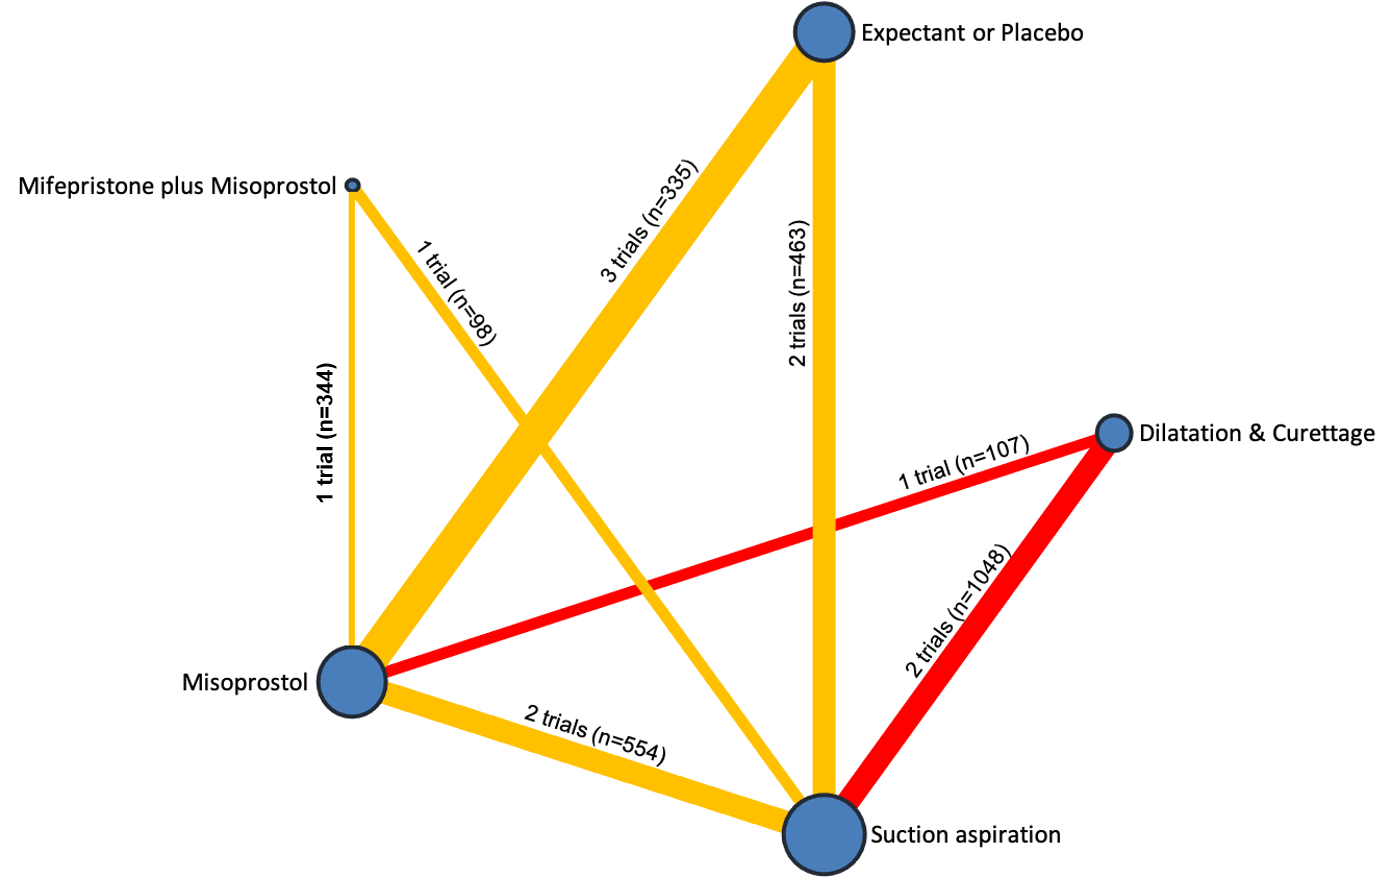
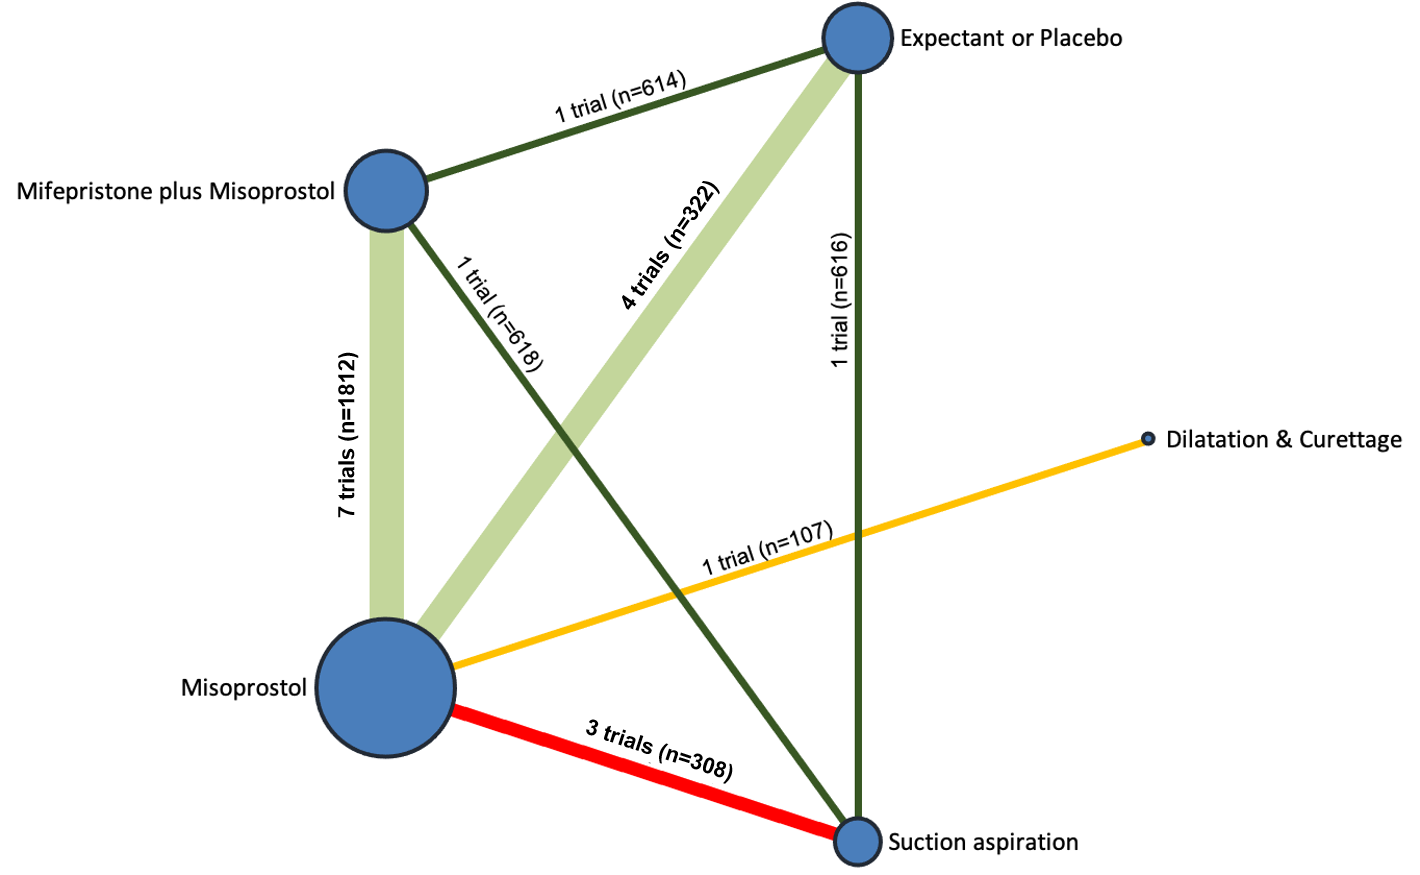
Network diagram for outcome of composite outcome of death or serious complication. The nodes represent an intervention and their size is proportional to the number of trials comparing this intervention to any other in the network. The lines connecting each pair of interventions represent a direct comparison and are drawn proportional to the number of trials making each direct comparison. Numbers on the lines represent the number of trials and participants for each comparison. The colour of the line is green for high‐certainty evidence; light green for moderate‐certainty evidence; orange for low‐certainty evidence and red for very low‐certainty evidence. Multi‐arm trials contribute to more than one comparison.
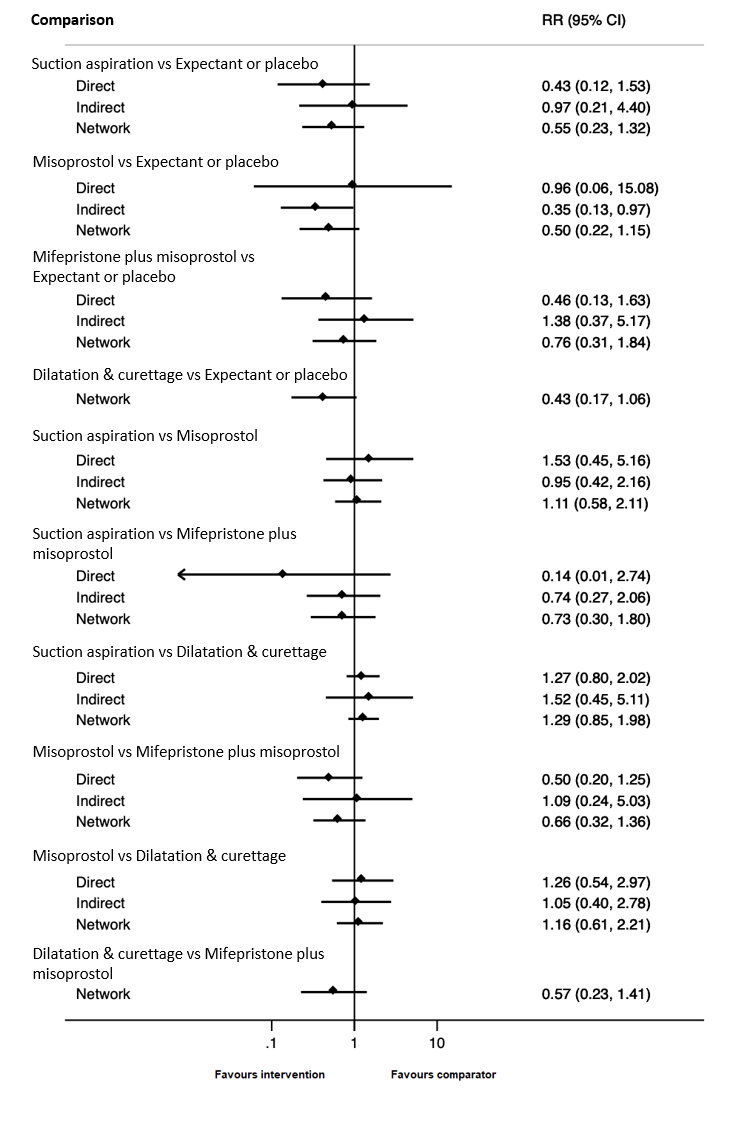
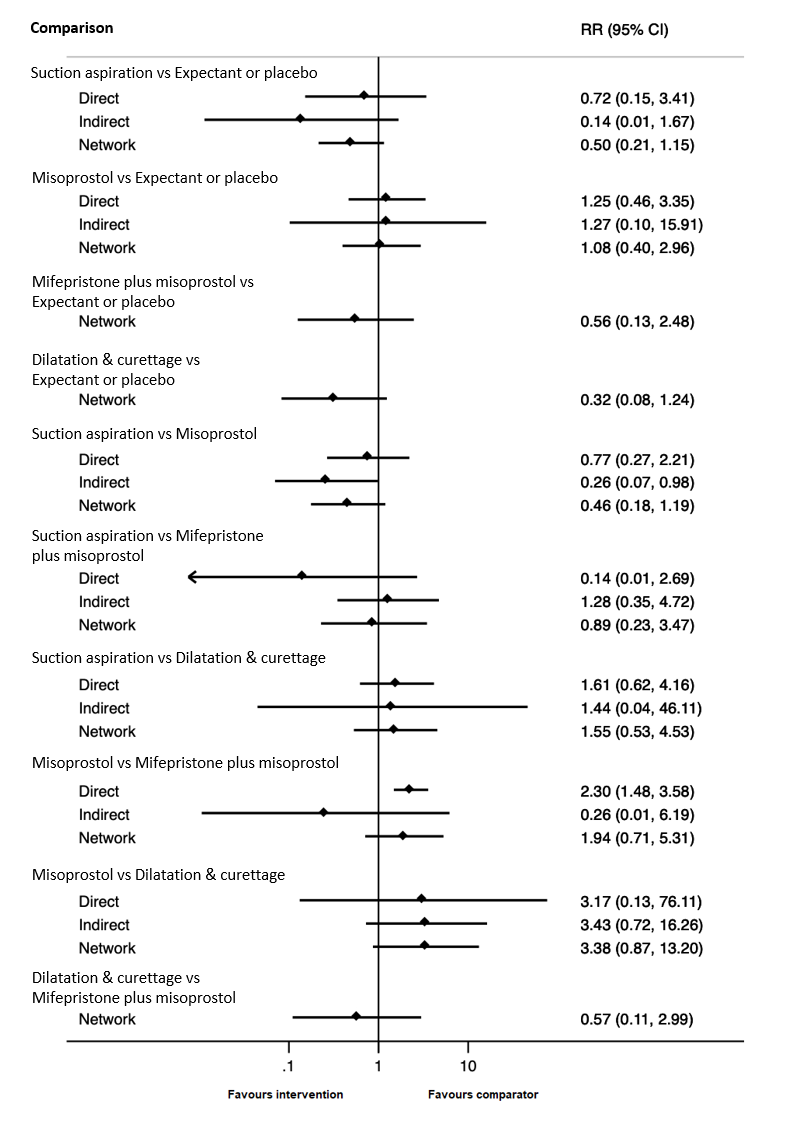
Forest plot with relative risk ratios and 95% CIs from pairwise, indirect and network (combining direct and indirect) analyses for outcome of composite outcome of death or serious complication.
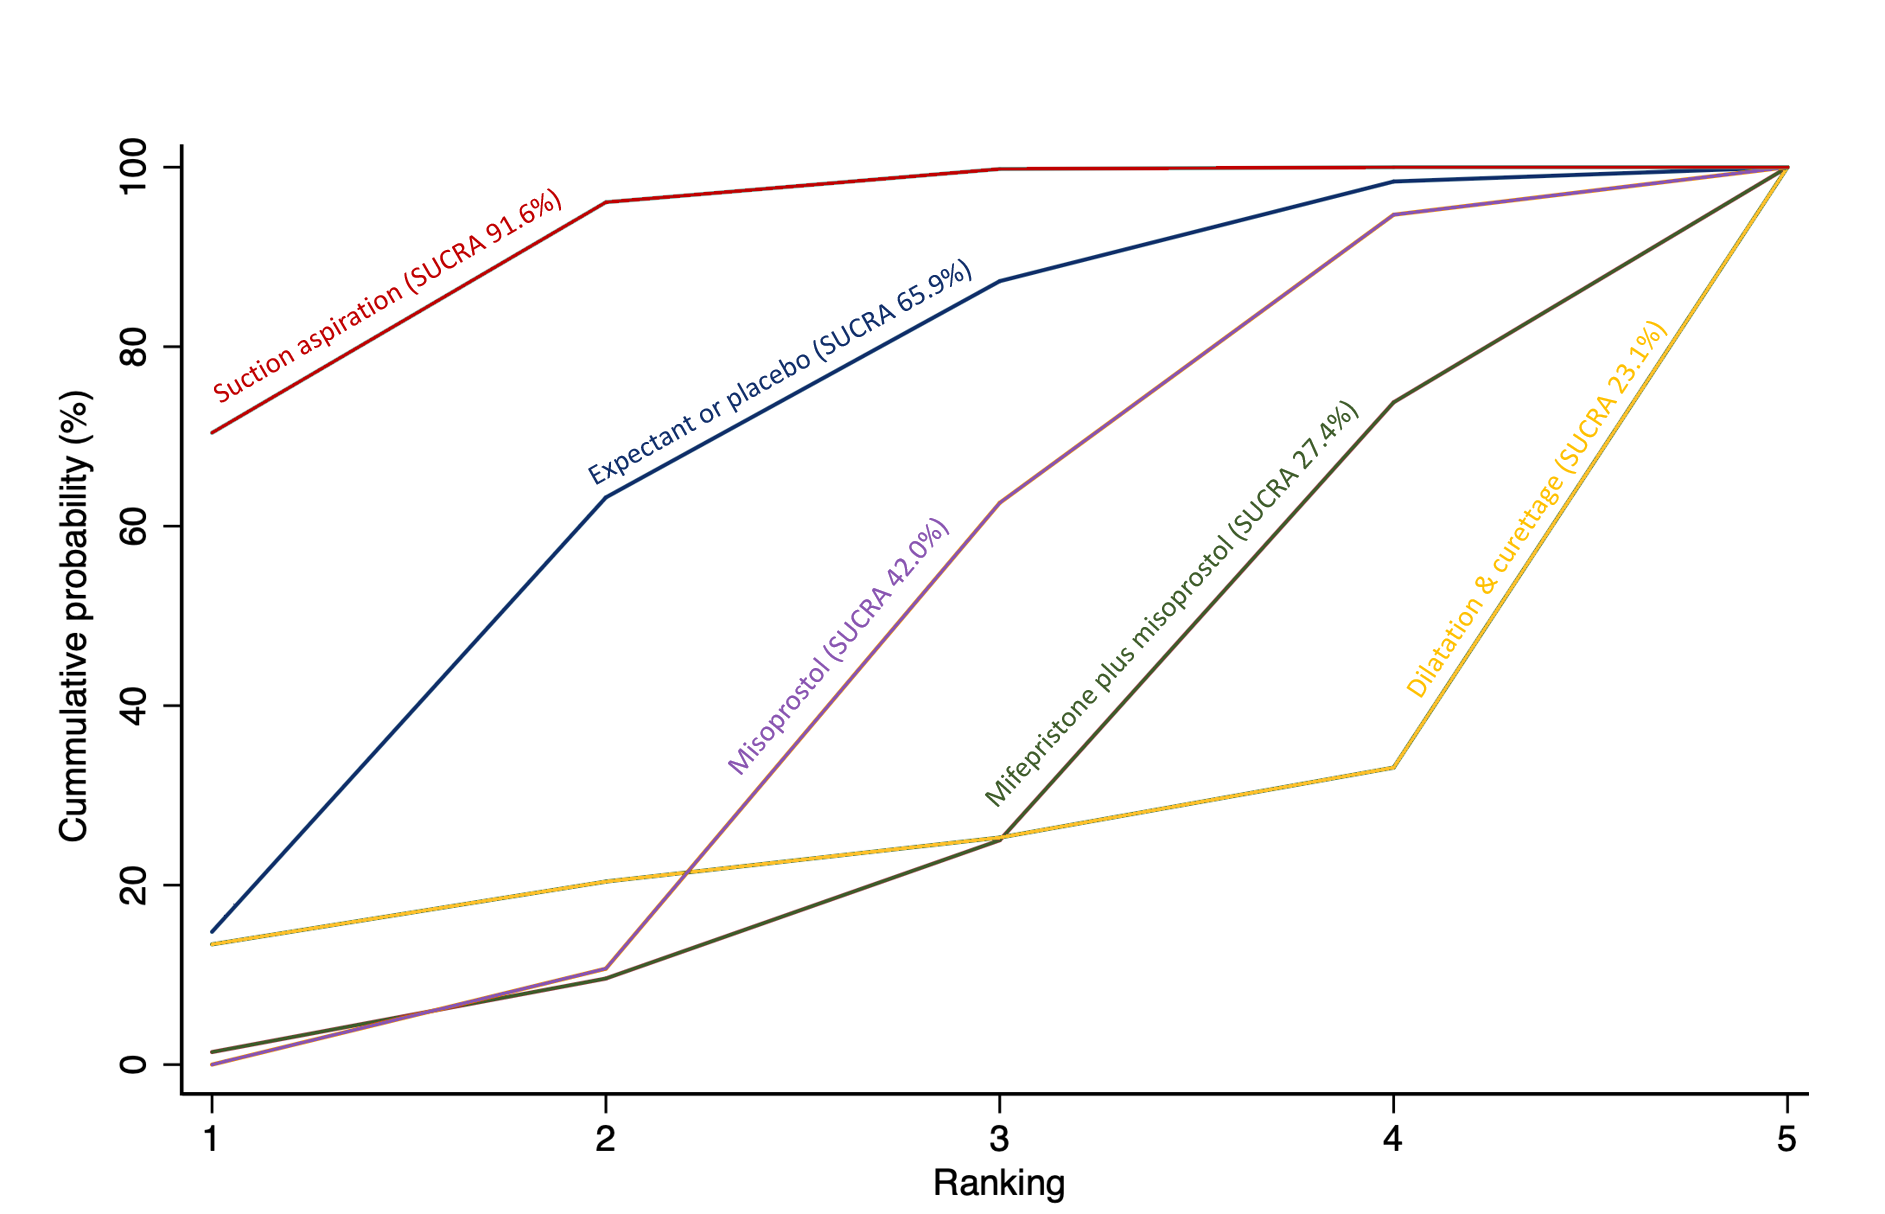
Cumulative rankogram comparing each of the methods of management of a miscarriage for the outcome of composite outcome of death or serious complication. Ranking indicates the cumulative probability of being the best method, the second best, the third best, etc. The x axis shows the relative ranking and the y‐axis the cumulative probability of each ranking. We estimate the SUrface underneath this Cumulative RAnking line (SUCRA); the larger the SUCRA the higher its rank among all available methods.

Network diagram for outcome of need for unplanned/ emergency surgical procedure. The nodes represent an intervention and their size is proportional to the number of trials comparing this intervention to any other in the network. The lines connecting each pair of interventions represent a direct comparison and are drawn proportional to the number of trials making each direct comparison. Numbers on the lines represent the number of trials and participants for each comparison. The colour of the line is green for high‐certainty evidence; light green for moderate‐certainty evidence; orange for low‐certainty evidence and red for very low‐certainty evidence. Multi‐arm trials contribute to more than one comparison.

Forest plot with relative risk ratios and 95% CIs from pairwise, indirect and network (combining direct and indirect) analyses for outcome of need for unplanned/ emergency surgical procedure.

Cumulative rankogram comparing each of the methods of management of a miscarriage for the outcome of need for unplanned/ emergency surgical procedure. Ranking indicates the cumulative probability of being the best method, the second best, the third best, etc. The x axis shows the relative ranking and the y‐axis the cumulative probability of each ranking. We estimate the SUrface underneath this Cumulative RAnking line (SUCRA); the larger the SUCRA the higher its rank among all available methods.
Network diagram for outcome of pain score (visual analogue scale). The nodes represent an intervention and their size is proportional to the number of trials comparing this intervention to any other in the network. The lines connecting each pair of interventions represent a direct comparison and are drawn proportional to the number of trials making each direct comparison. Numbers on the lines represent the number of trials and participants for each comparison. The colour of the line is green for high‐certainty evidence; light green for moderate‐certainty evidence; orange for low‐certainty evidence and red for very low‐certainty evidence. Multi‐arm trials contribute to more than one comparison.
Network diagram for outcome of pelvic inflammatory disease, sepsis or endometritis. The nodes represent an intervention and their size is proportional to the number of trials comparing this intervention to any other in the network. The lines connecting each pair of interventions represent a direct comparison and are drawn proportional to the number of trials making each direct comparison. Numbers on the lines represent the number of trials and participants for each comparison. The colour of the line is green for high‐certainty evidence; light green for moderate‐certainty evidence; orange for low‐certainty evidence and red for very low‐certainty evidence. Multi‐arm trials contribute to more than one comparison.

Forest plot with relative risk ratios and 95% CIs from pairwise, indirect and network (combining direct and indirect) analyses for outcome of pelvic inflammatory disease, sepsis or endometritis.

Cumulative rankogram comparing each of the methods of management of a miscarriage for the outcome of pelvic inflammatory disease, sepsis or endometritis. Ranking indicates the cumulative probability of being the best method, the second best, the third best, etc. The x axis shows the relative ranking and the y‐axis the cumulative probability of each ranking. We estimate the SUrface underneath this Cumulative RAnking line (SUCRA); the larger the SUCRA the higher its rank among all available methods.

Network diagram for outcome of mean volumes of blood loss (millilitres). The nodes represent an intervention and their size is proportional to the number of trials comparing this intervention to any other in the network. The lines connecting each pair of interventions represent a direct comparison and are drawn proportional to the number of trials making each direct comparison. Numbers on the lines represent the number of trials and participants for each comparison. Multi‐arm trials contribute to more than one comparison.

Network diagram for outcome of change in haemoglobin measurements before and after the miscarriage. The nodes represent an intervention and their size is proportional to the number of trials comparing this intervention to any other in the network. The lines connecting each pair of interventions represent a direct comparison and are drawn proportional to the number of trials making each direct comparison. Numbers on the lines represent the number of trials and participants for each comparison. The colour of the line is green for high‐certainty evidence; light green for moderate‐certainty evidence; orange for low‐certainty evidence and red for very low‐certainty evidence. Multi‐arm trials contribute to more than one comparison.

Forest plot with relative risk ratios and 95% CIs from pairwise, indirect and network (combining direct and indirect) analyses for outcome of change in haemoglobin measurements before and after the miscarriage.
Cumulative rankogram comparing each of the methods of management of a miscarriage for the outcome of change in haemoglobin measurements before and after the miscarriage. Ranking indicates the cumulative probability of being the best method, the second best, the third best, etc. The x axis shows the relative ranking and the y‐axis the cumulative probability of each ranking. We estimate the SUrface underneath this Cumulative RAnking line (SUCRA); the larger the SUCRA the higher its rank among all available methods.
Network diagram for outcome of days of bleeding. The nodes represent an intervention and their size is proportional to the number of trials comparing this intervention to any other in the network. The lines connecting each pair of interventions represent a direct comparison and are drawn proportional to the number of trials making each direct comparison. Numbers on the lines represent the number of trials and participants for each comparison. The colour of the line is green for high‐certainty evidence; light green for moderate‐certainty evidence; orange for low‐certainty evidence and red for very low‐certainty evidence. Multi‐arm trials contribute to more than one comparison.
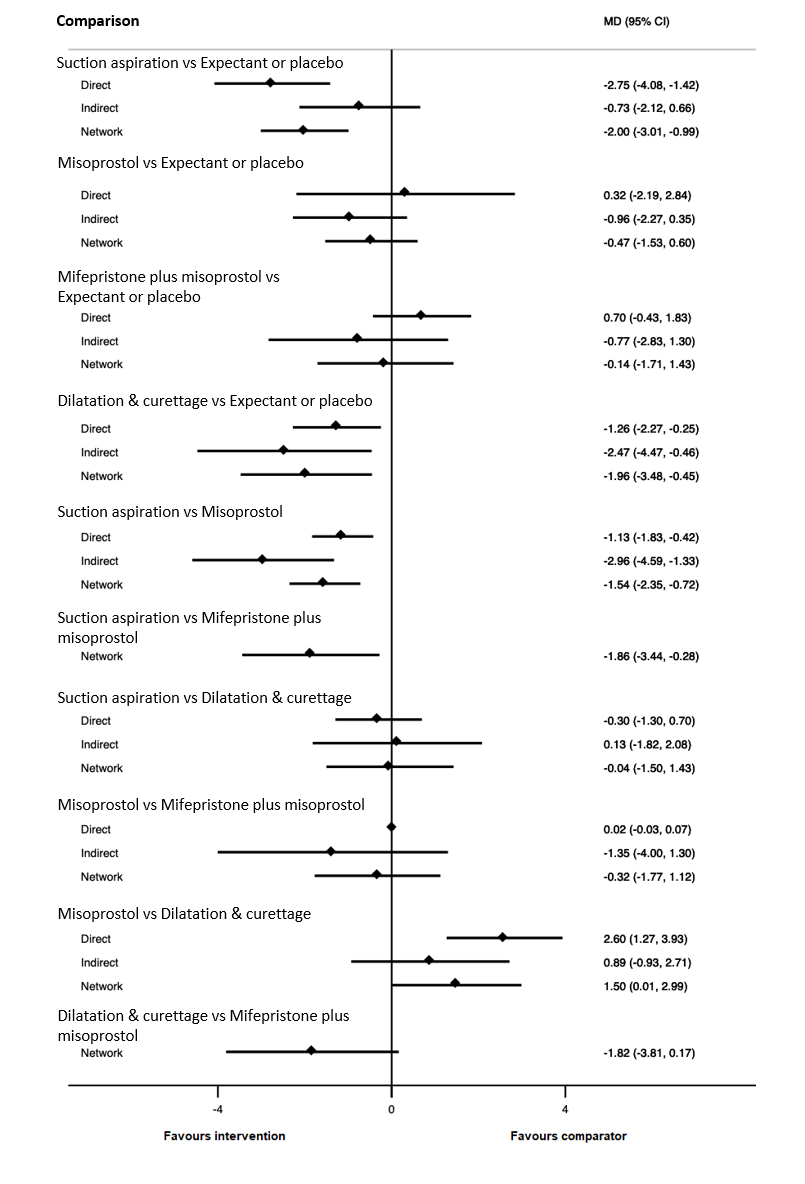
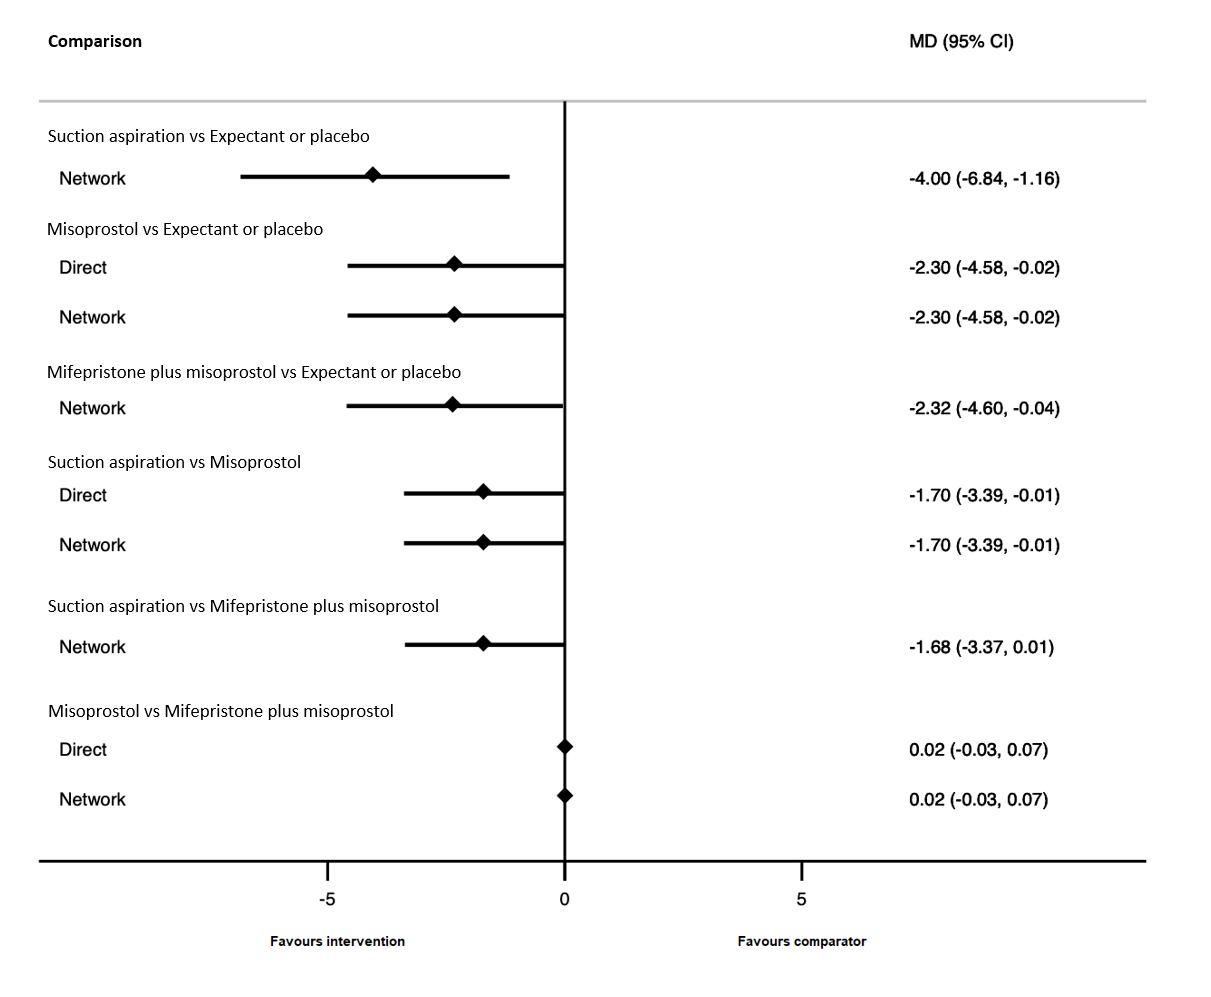
Forest plot with relative risk ratios and 95% CIs from pairwise, indirect and network (combining direct and indirect) analyses for outcome of days of bleeding.
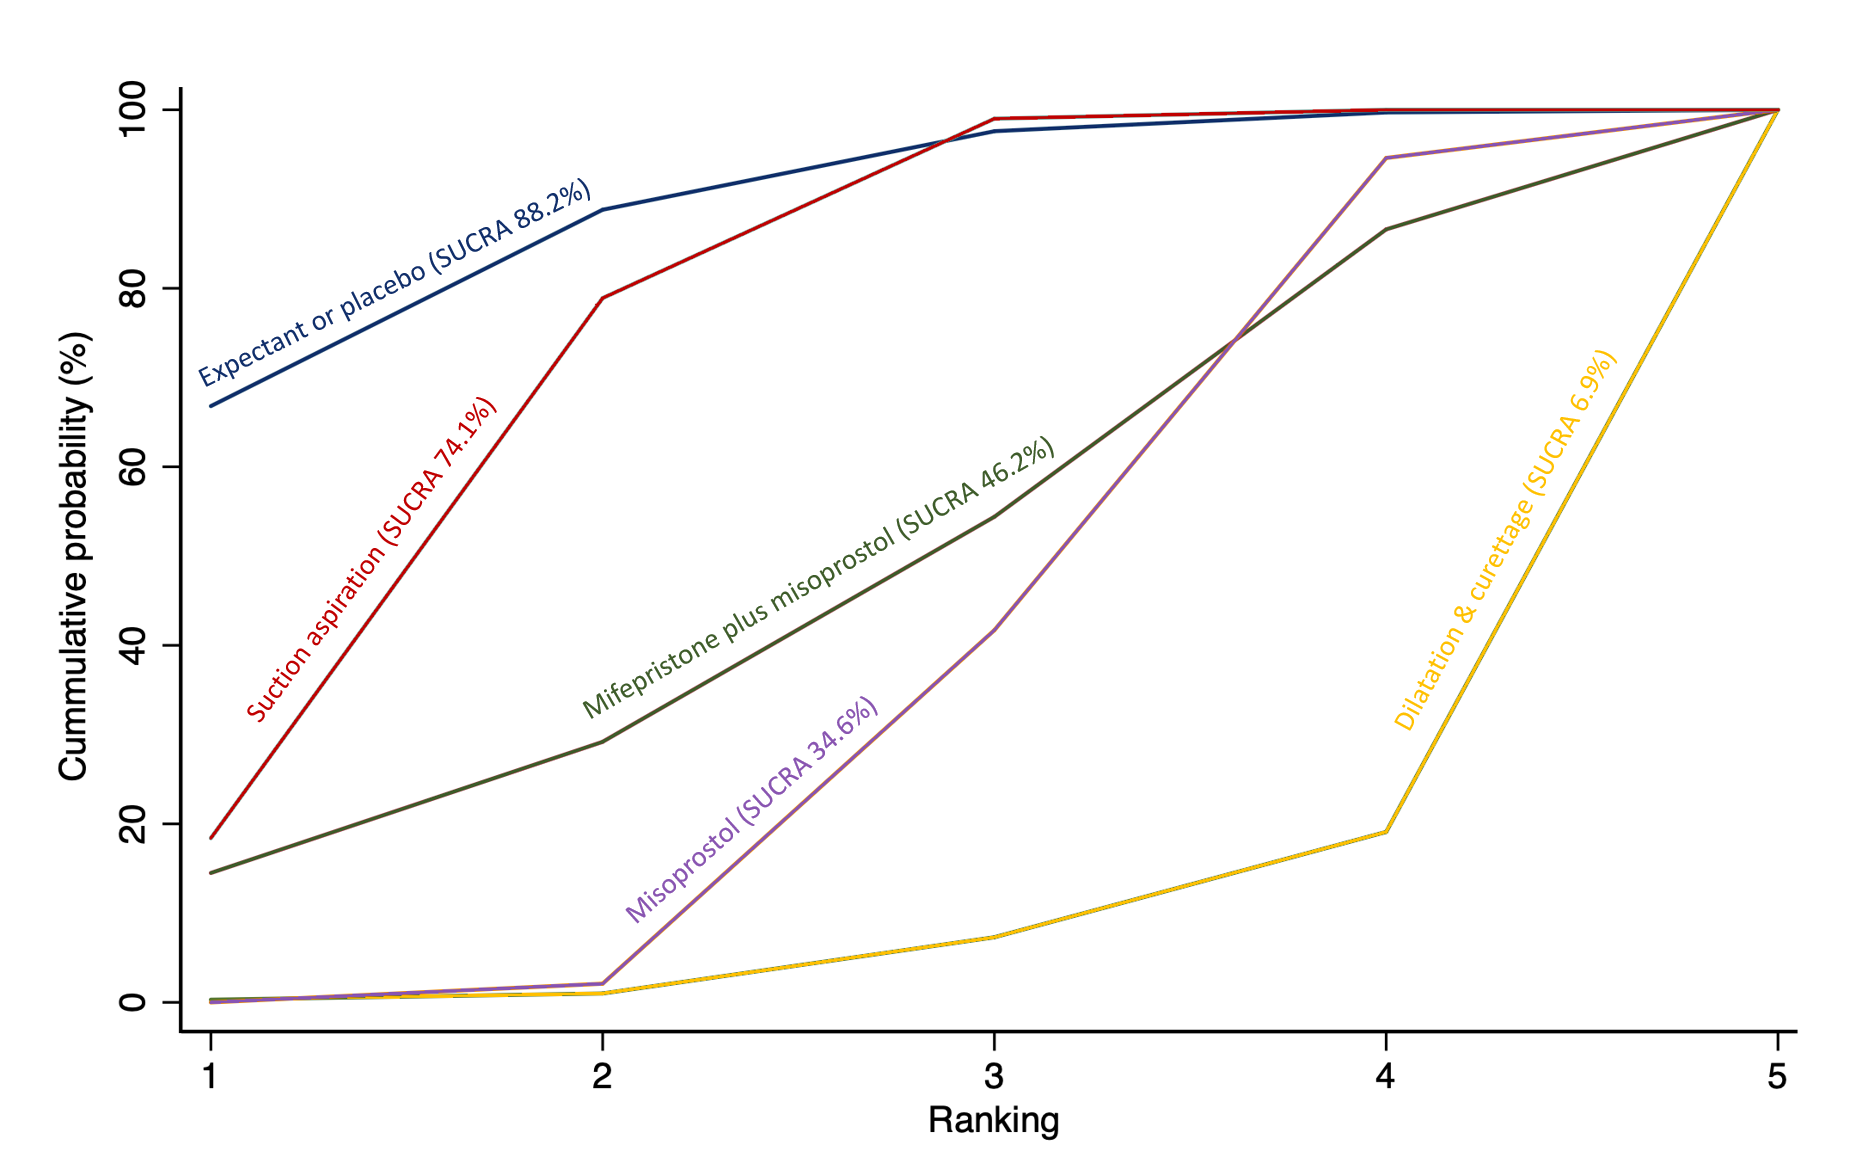
Cumulative rankogram comparing each of the methods of management of a miscarriage for the outcome of days of bleeding. Ranking indicates the cumulative probability of being the best method, the second best, the third best, etc. The x axis shows the relative ranking and the y‐axis the cumulative probability of each ranking. We estimate the SUrface underneath this Cumulative RAnking line (SUCRA); the larger the SUCRA the higher its rank among all available methods.

Network diagram for outcome of mean duration of hospital stay (days). The nodes represent an intervention and their size is proportional to the number of trials comparing this intervention to any other in the network. The lines connecting each pair of interventions represent a direct comparison and are drawn proportional to the number of trials making each direct comparison. Numbers on the lines represent the number of trials and participants for each comparison. Multi‐arm trials contribute to more than one comparison.
Network diagram for outcome of readmission to hospital. The nodes represent an intervention and their size is proportional to the number of trials comparing this intervention to any other in the network. The lines connecting each pair of interventions represent a direct comparison and are drawn proportional to the number of trials making each direct comparison. Numbers on the lines represent the number of trials and participants for each comparison. The colour of the line is green for high‐certainty evidence; light green for moderate‐certainty evidence; orange for low‐certainty evidence and red for very low‐certainty evidence. Multi‐arm trials contribute to more than one comparison.
Forest plot with relative risk ratios and 95% CIs from pairwise, indirect and network (combining direct and indirect) analyses for outcome of readmission to hospital.
Cumulative rankogram comparing each of the methods of management of a miscarriage for the outcome of readmission to hospital. Ranking indicates the cumulative probability of being the best method, the second best, the third best, etc. The x axis shows the relative ranking and the y‐axis the cumulative probability of each ranking. We estimate the SUrface underneath this Cumulative RAnking line (SUCRA); the larger the SUCRA the higher its rank among all available methods.

Network diagram for outcome of nausea. The nodes represent an intervention and their size is proportional to the number of trials comparing this intervention to any other in the network. The lines connecting each pair of interventions represent a direct comparison and are drawn proportional to the number of trials making each direct comparison. Numbers on the lines represent the number of trials and participants for each comparison. The colour of the line is green for high‐certainty evidence; light green for moderate‐certainty evidence; orange for low‐certainty evidence and red for very low‐certainty evidence. Multi‐arm trials contribute to more than one comparison.

Forest plot with relative risk ratios and 95% CIs from pairwise, indirect and network (combining direct and indirect) analyses for outcome of nausea.
Cumulative rankogram comparing each of the methods of management of a miscarriage for the outcome of nausea. Ranking indicates the cumulative probability of being the best method, the second best, the third best, etc. The x axis shows the relative ranking and the y‐axis the cumulative probability of each ranking. We estimate the SUrface underneath this Cumulative RAnking line (SUCRA); the larger the SUCRA the higher its rank among all available methods.

Network diagram for outcome of vomiting. The nodes represent an intervention and their size is proportional to the number of trials comparing this intervention to any other in the network. The lines connecting each pair of interventions represent a direct comparison and are drawn proportional to the number of trials making each direct comparison. Numbers on the lines represent the number of trials and participants for each comparison. The colour of the line is green for high‐certainty evidence; light green for moderate‐certainty evidence; orange for low‐certainty evidence and red for very low‐certainty evidence. Multi‐arm trials contribute to more than one comparison.

Forest plot with relative risk ratios and 95% CIs from pairwise, indirect and network (combining direct and indirect) analyses for outcome of vomiting.

Cumulative rankogram comparing each of the methods of management of a miscarriage for the outcome of vomiting. Ranking indicates the cumulative probability of being the best method, the second best, the third best, etc. The x axis shows the relative ranking and the y‐axis the cumulative probability of each ranking. We estimate the SUrface underneath this Cumulative RAnking line (SUCRA); the larger the SUCRA the higher its rank among all available methods.

Network diagram for outcome of diarrhoea. The nodes represent an intervention and their size is proportional to the number of trials comparing this intervention to any other in the network. The lines connecting each pair of interventions represent a direct comparison and are drawn proportional to the number of trials making each direct comparison. Numbers on the lines represent the number of trials and participants for each comparison. The colour of the line is green for high‐certainty evidence; light green for moderate‐certainty evidence; orange for low‐certainty evidence and red for very low‐certainty evidence. Multi‐arm trials contribute to more than one comparison.
Forest plot with relative risk ratios and 95% CIs from pairwise, indirect and network (combining direct and indirect) analyses for outcome of diarrhoea.
Cumulative rankogram comparing each of the methods of management of a miscarriage for the outcome of diarrhoea. Ranking indicates the cumulative probability of being the best method, the second best, the third best, etc. The x axis shows the relative ranking and the y‐axis the cumulative probability of each ranking. We estimate the SUrface underneath this Cumulative RAnking line (SUCRA); the larger the SUCRA the higher its rank among all available methods.
Network diagram for outcome of pyrexia. The nodes represent an intervention and their size is proportional to the number of trials comparing this intervention to any other in the network. The lines connecting each pair of interventions represent a direct comparison and are drawn proportional to the number of trials making each direct comparison. Numbers on the lines represent the number of trials and participants for each comparison. The colour of the line is green for high‐certainty evidence; light green for moderate‐certainty evidence; orange for low‐certainty evidence and red for very low‐certainty evidence. Multi‐arm trials contribute to more than one comparison.
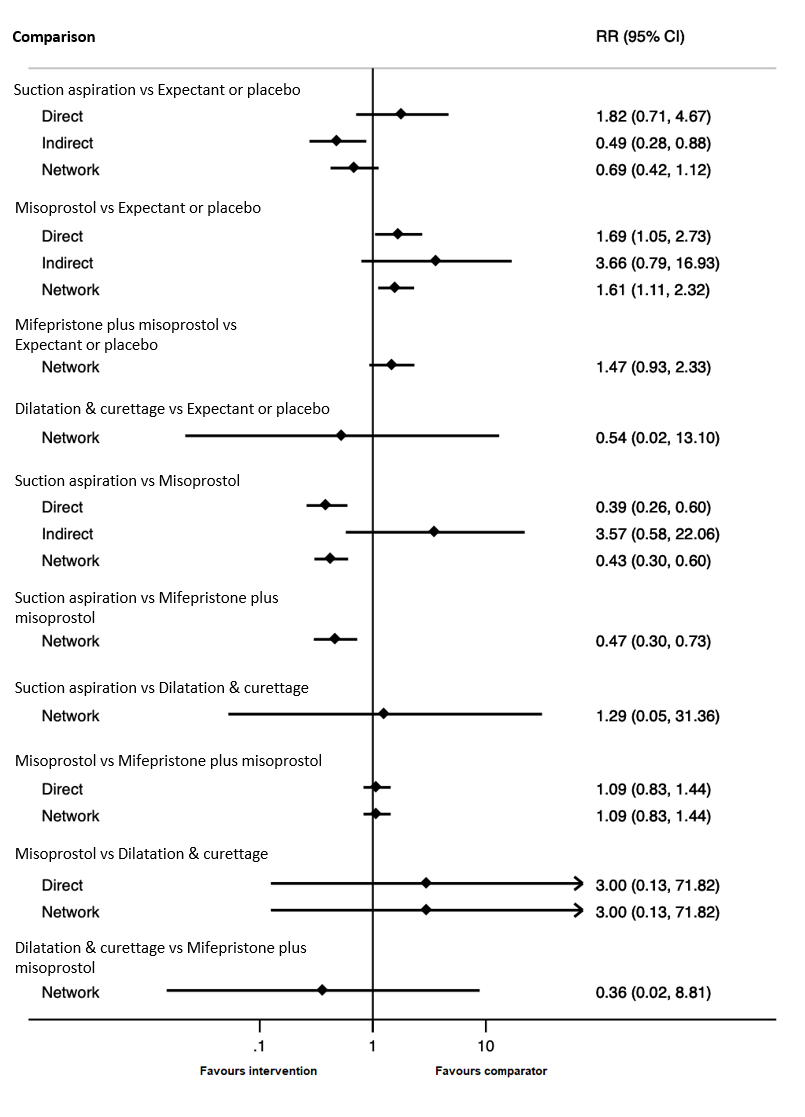
Forest plot with relative risk ratios and 95% CIs from pairwise, indirect and network (combining direct and indirect) analyses for outcome of pyrexia.
Cumulative rankogram comparing each of the methods of management of a miscarriage for the outcome of pyrexia. Ranking indicates the cumulative probability of being the best method, the second best, the third best, etc. The x axis shows the relative ranking and the y‐axis the cumulative probability of each ranking. We estimate the SUrface underneath this Cumulative RAnking line (SUCRA); the larger the SUCRA the higher its rank among all available methods.
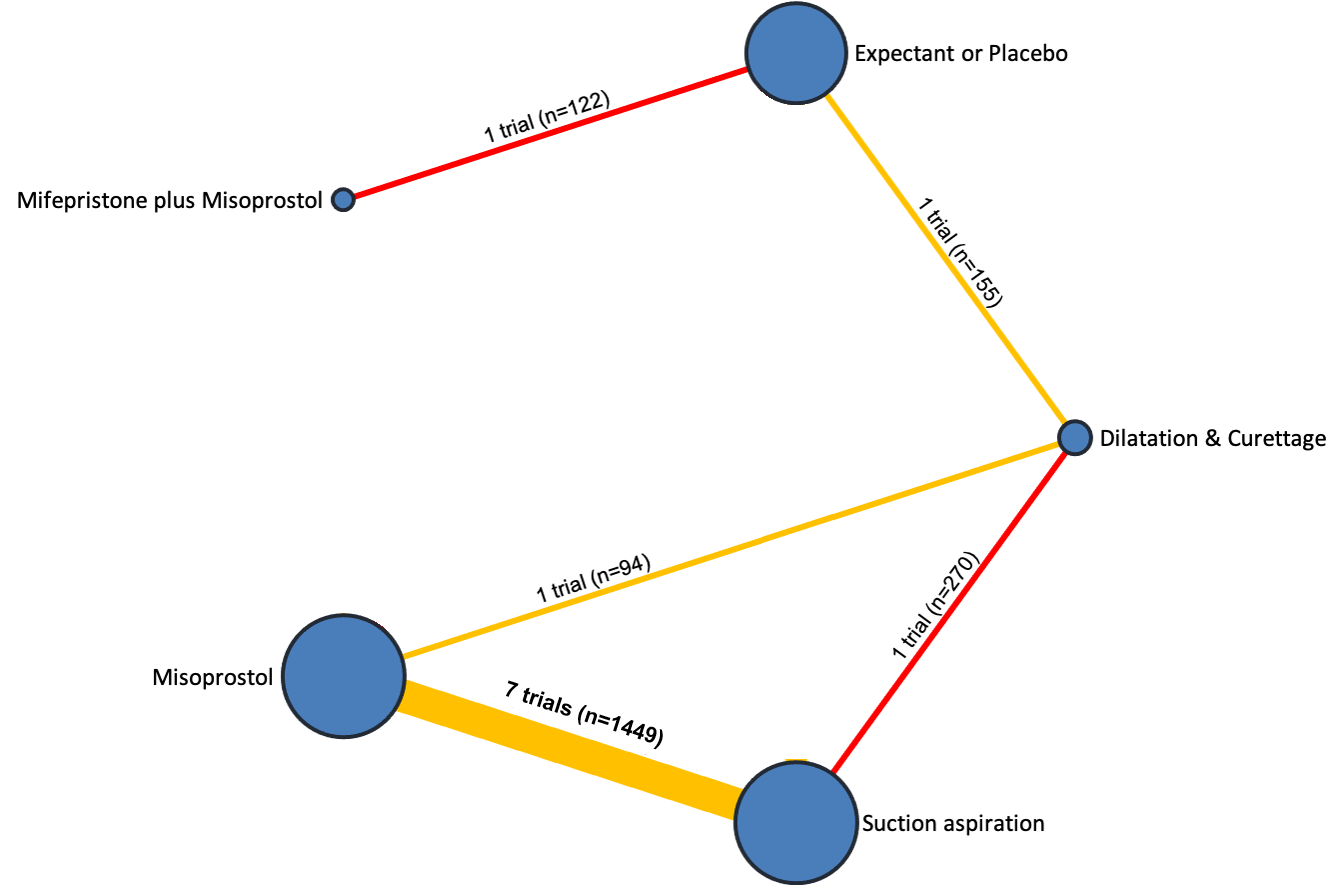
Network diagram for missed miscarriage subgroup analysis of outcome of complete miscarriage. The nodes represent an intervention and their size is proportional to the number of trials comparing this intervention to any other in the network. The lines connecting each pair of interventions represent a direct comparison and are drawn proportional to the number of trials making each direct comparison. Numbers on the lines represent the number of trials and participants for each comparison. The colour of the line is green for high‐certainty evidence; light green for moderate‐certainty evidence; orange for low‐certainty evidence and red for very low‐certainty evidence. Multi‐arm trials contribute to more than one comparison.
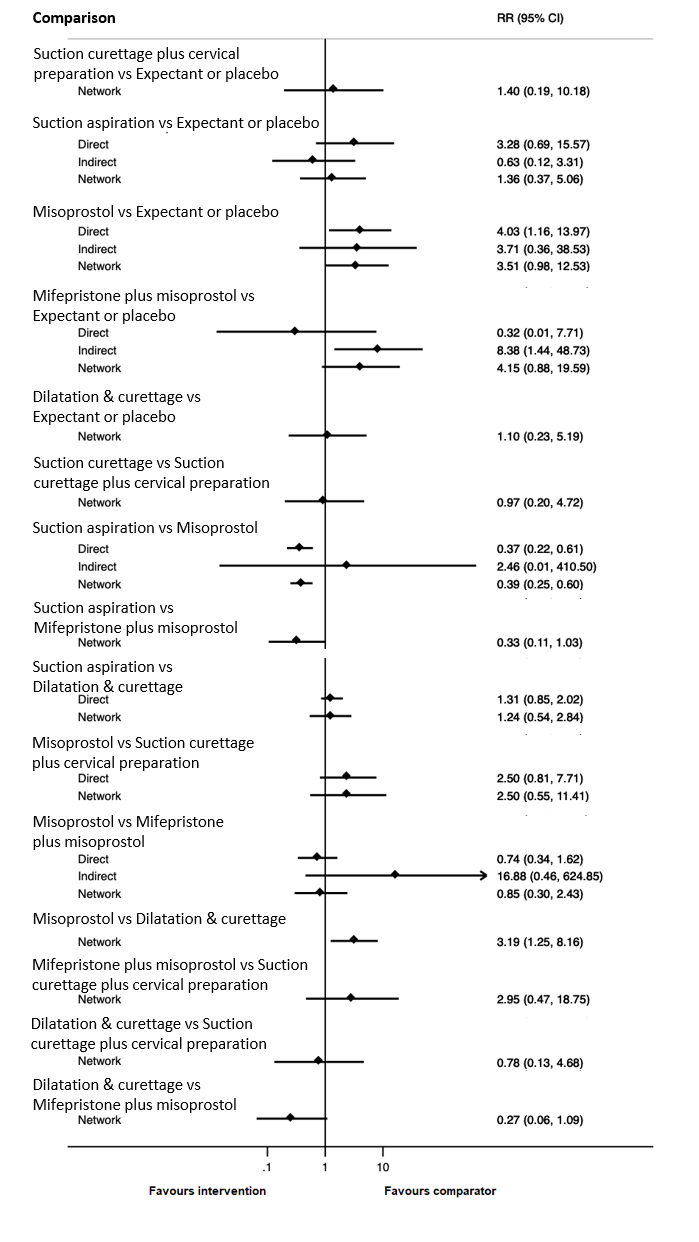
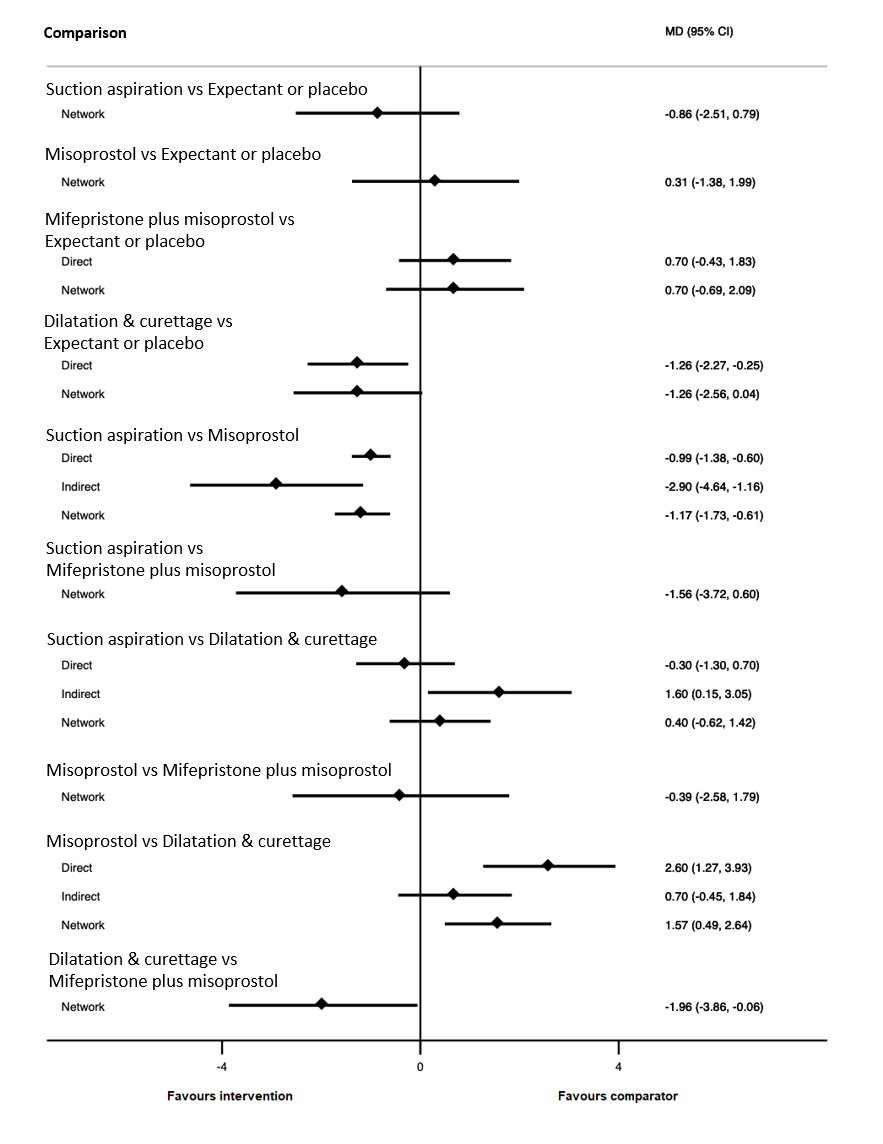
Forest plot with relative risk ratios and 95% CIs from pairwise, indirect and network (combining direct and indirect) analyses for missed miscarriage subgroup of complete miscarriage outcome.

Cumulative rankogram comparing each of the methods of management of a miscarriage for missed miscarriage subgroup analysis for the outcome of complete miscarriage. Ranking indicates the cumulative probability of being the best method, the second best, the third best, etc. The x axis shows the relative ranking and the y‐axis the cumulative probability of each ranking. We estimate the SUrface underneath this Cumulative RAnking line (SUCRA); the larger the SUCRA the higher its rank among all available methods.

Network diagram for missed miscarriage subgroup analysis of outcome of days of bleeding. The nodes represent an intervention and their size is proportional to the number of trials comparing this intervention to any other in the network. The lines connecting each pair of interventions represent a direct comparison and are drawn proportional to the number of trials making each direct comparison. Numbers on the lines represent the number of trials and participants for each comparison. The colour of the line is green for high‐certainty evidence; light green for moderate‐certainty evidence; orange for low‐certainty evidence and red for very low‐certainty evidence. Multi‐arm trials contribute to more than one comparison.
Forest plot with relative risk ratios and 95% CIs from pairwise, indirect and network (combining direct and indirect) analyses for missed miscarriage subgroup of the days of bleeding outcome.

Cumulative rankogram comparing each of the methods of management of a miscarriage for missed miscarriage subgroup analysis for the outcome of days of bleeding. Ranking indicates the cumulative probability of being the best method, the second best, the third best, etc. The x axis shows the relative ranking and the y‐axis the cumulative probability of each ranking. We estimate the SUrface underneath this Cumulative RAnking line (SUCRA); the larger the SUCRA the higher its rank among all available methods.
Network diagram for incomplete miscarriage subgroup analysis of outcome of complete miscarriage. The nodes represent an intervention and their size is proportional to the number of trials comparing this intervention to any other in the network. The lines connecting each pair of interventions represent a direct comparison and are drawn proportional to the number of trials making each direct comparison. Numbers on the lines represent the number of trials and participants for each comparison. The colour of the line is green for high‐certainty evidence; light green for moderate‐certainty evidence; orange for low‐certainty evidence and red for very low‐certainty evidence. Multi‐arm trials contribute to more than one comparison.
Forest plot with relative risk ratios and 95% CIs from pairwise, indirect and network (combining direct and indirect) analyses for incomplete miscarriage subgroup of complete miscarriage outcome.
Network diagram for incomplete miscarriage subgroup analysis of outcome of days of bleeding. The nodes represent an intervention and their size is proportional to the number of trials comparing this intervention to any other in the network. The lines connecting each pair of interventions represent a direct comparison and are drawn proportional to the number of trials making each direct comparison. Numbers on the lines represent the number of trials and participants for each comparison. The colour of the line is green for high‐certainty evidence; light green for moderate‐certainty evidence; orange for low‐certainty evidence and red for very low‐certainty evidence. Multi‐arm trials contribute to more than one comparison.
Forest plot with relative risk ratios and 95% CIs from pairwise, indirect and network (combining direct and indirect) analyses for incomplete miscarriage subgroup of the days of bleeding outcome.
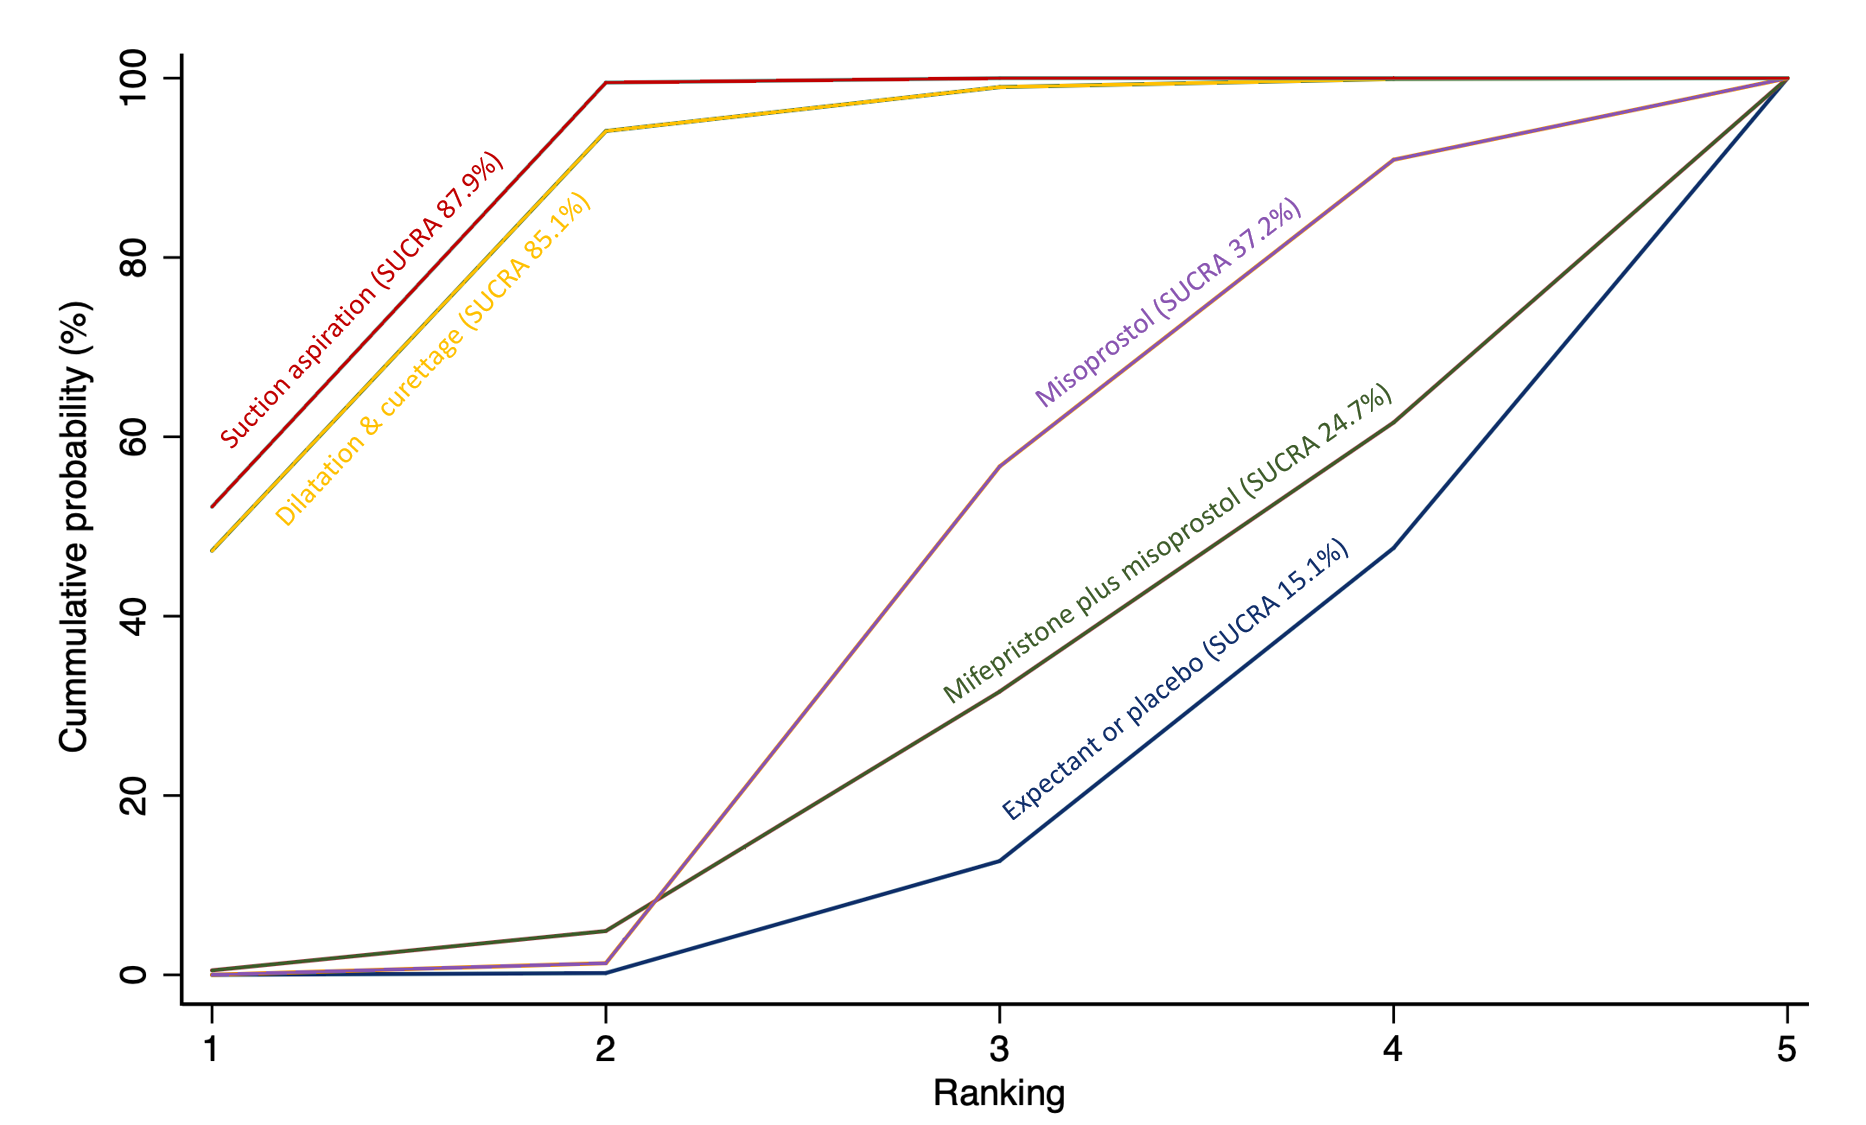
Cumulative rankogram comparing each of the methods of management of a miscarriage for incomplete miscarriage subgroup analysis for the outcome of days of bleeding. Ranking indicates the cumulative probability of being the best method, the second best, the third best, etc. The x axis shows the relative ranking and the y‐axis the cumulative probability of each ranking. We estimate the SUrface underneath this Cumulative RAnking line (SUCRA); the larger the SUCRA the higher its rank among all available methods.

Comparison 1: Suction aspiration vs Misoprostol, Outcome 1: Complete Miscarriage

Comparison 1: Suction aspiration vs Misoprostol, Outcome 2: Composite outcome of death or serious complication

Comparison 1: Suction aspiration vs Misoprostol, Outcome 3: Need for unplanned/emergency surgical procedure

Comparison 1: Suction aspiration vs Misoprostol, Outcome 4: Pain score

Comparison 1: Suction aspiration vs Misoprostol, Outcome 5: Pelvic inflammatory disease, sepsis or endometritis

Comparison 1: Suction aspiration vs Misoprostol, Outcome 6: Change in haemoglobin measurements before and after the miscarriage

Comparison 1: Suction aspiration vs Misoprostol, Outcome 7: Days of bleeding

Comparison 1: Suction aspiration vs Misoprostol, Outcome 8: Cervical tear

Comparison 1: Suction aspiration vs Misoprostol, Outcome 9: Mean duration of hospital stay (days)

Comparison 1: Suction aspiration vs Misoprostol, Outcome 10: Re‐admission to hospital

Comparison 1: Suction aspiration vs Misoprostol, Outcome 11: Nausea

Comparison 1: Suction aspiration vs Misoprostol, Outcome 12: Vomiting

Comparison 1: Suction aspiration vs Misoprostol, Outcome 13: Diarrhoea

Comparison 1: Suction aspiration vs Misoprostol, Outcome 14: Pyrexia

Comparison 1: Suction aspiration vs Misoprostol, Outcome 15: Anxiety score

Comparison 1: Suction aspiration vs Misoprostol, Outcome 16: Depression score

Comparison 2: Suction aspiration vs Mifepristone + Misoprostol, Outcome 1: Complete Miscarriage

Comparison 2: Suction aspiration vs Mifepristone + Misoprostol, Outcome 2: Composite outcome of death or serious complication

Comparison 2: Suction aspiration vs Mifepristone + Misoprostol, Outcome 3: Need for unplanned/emergency surgical procedure

Comparison 2: Suction aspiration vs Mifepristone + Misoprostol, Outcome 4: Pelvic inflammatory disease, sepsis or endometritis

Comparison 2: Suction aspiration vs Mifepristone + Misoprostol, Outcome 5: Re‐admission to hospital

Comparison 3: Suction aspiration vs Dilatation & Curettage, Outcome 1: Complete Miscarriage

Comparison 3: Suction aspiration vs Dilatation & Curettage, Outcome 2: Composite outcome of death or serious complication

Comparison 3: Suction aspiration vs Dilatation & Curettage, Outcome 3: Need for unplanned/emergency surgical procedure

Comparison 3: Suction aspiration vs Dilatation & Curettage, Outcome 4: Pelvic inflammatory disease, sepsis or endometritis

Comparison 3: Suction aspiration vs Dilatation & Curettage, Outcome 5: Mean volumes of blood loss (millilitres)

Comparison 3: Suction aspiration vs Dilatation & Curettage, Outcome 6: Change in haemoglobin measurements before and after the miscarriage

Comparison 3: Suction aspiration vs Dilatation & Curettage, Outcome 7: Days of bleeding

Comparison 3: Suction aspiration vs Dilatation & Curettage, Outcome 8: Cervical tear

Comparison 3: Suction aspiration vs Dilatation & Curettage, Outcome 9: Mean duration of hospital stay (days)

Comparison 3: Suction aspiration vs Dilatation & Curettage, Outcome 10: Re‐admission to hospital

Comparison 3: Suction aspiration vs Dilatation & Curettage, Outcome 11: Vomiting

Comparison 3: Suction aspiration vs Dilatation & Curettage, Outcome 12: Pyrexia

Comparison 4: Suction aspiration vs Expectant/ Placebo, Outcome 1: Complete Miscarriage

Comparison 4: Suction aspiration vs Expectant/ Placebo, Outcome 2: Composite outcome of death or serious complication

Comparison 4: Suction aspiration vs Expectant/ Placebo, Outcome 3: Need for unplanned/emergency surgical procedure

Comparison 4: Suction aspiration vs Expectant/ Placebo, Outcome 4: Pelvic inflammatory disease, sepsis or endometritis

Comparison 4: Suction aspiration vs Expectant/ Placebo, Outcome 5: Mean volumes of blood loss (millilitres)

Comparison 4: Suction aspiration vs Expectant/ Placebo, Outcome 6: Change in haemoglobin measurements before and after the miscarriage

Comparison 4: Suction aspiration vs Expectant/ Placebo, Outcome 7: Days of bleeding

Comparison 4: Suction aspiration vs Expectant/ Placebo, Outcome 8: Cervical tear

Comparison 4: Suction aspiration vs Expectant/ Placebo, Outcome 9: Mean duration of hospital stay (days)

Comparison 4: Suction aspiration vs Expectant/ Placebo, Outcome 10: Re‐admission to hospital

Comparison 4: Suction aspiration vs Expectant/ Placebo, Outcome 11: Vomiting

Comparison 4: Suction aspiration vs Expectant/ Placebo, Outcome 12: Diarrhoea

Comparison 4: Suction aspiration vs Expectant/ Placebo, Outcome 13: Pyrexia

Comparison 4: Suction aspiration vs Expectant/ Placebo, Outcome 14: Anxiety score

Comparison 4: Suction aspiration vs Expectant/ Placebo, Outcome 15: Depression score

Comparison 5: Misoprostol vs Mifepristone + Misoprostol, Outcome 1: Complete Miscarriage

Comparison 5: Misoprostol vs Mifepristone + Misoprostol, Outcome 2: Composite outcome of death or serious complication

Comparison 5: Misoprostol vs Mifepristone + Misoprostol, Outcome 3: Need for unplanned/emergency surgical procedure

Comparison 5: Misoprostol vs Mifepristone + Misoprostol, Outcome 4: Pelvic inflammatory disease, sepsis or endometritis

Comparison 5: Misoprostol vs Mifepristone + Misoprostol, Outcome 5: Change in haemoglobin measurements before and after the miscarriage

Comparison 5: Misoprostol vs Mifepristone + Misoprostol, Outcome 6: Days of bleeding

Comparison 5: Misoprostol vs Mifepristone + Misoprostol, Outcome 7: Re‐admission to hospital

Comparison 5: Misoprostol vs Mifepristone + Misoprostol, Outcome 8: Nausea

Comparison 5: Misoprostol vs Mifepristone + Misoprostol, Outcome 9: Vomiting

Comparison 5: Misoprostol vs Mifepristone + Misoprostol, Outcome 10: Diarrhoea

Comparison 5: Misoprostol vs Mifepristone + Misoprostol, Outcome 11: Pyrexia

Comparison 6: Misoprostol vs Dilatation & Curettage, Outcome 1: Complete Miscarriage

Comparison 6: Misoprostol vs Dilatation & Curettage, Outcome 2: Composite outcome of death or serious complication

Comparison 6: Misoprostol vs Dilatation & Curettage, Outcome 3: Need for unplanned/emergency surgical procedure

Comparison 6: Misoprostol vs Dilatation & Curettage, Outcome 4: Pain score

Comparison 6: Misoprostol vs Dilatation & Curettage, Outcome 5: Pelvic inflammatory disease, sepsis or endometritis

Comparison 6: Misoprostol vs Dilatation & Curettage, Outcome 6: Mean volumes of blood loss (millilitres)

Comparison 6: Misoprostol vs Dilatation & Curettage, Outcome 7: Days of bleeding

Comparison 6: Misoprostol vs Dilatation & Curettage, Outcome 8: Cervical tear

Comparison 6: Misoprostol vs Dilatation & Curettage, Outcome 9: Re‐admission to hospital

Comparison 6: Misoprostol vs Dilatation & Curettage, Outcome 10: Vomiting

Comparison 6: Misoprostol vs Dilatation & Curettage, Outcome 11: Nausea

Comparison 6: Misoprostol vs Dilatation & Curettage, Outcome 12: Diarrhoea

Comparison 6: Misoprostol vs Dilatation & Curettage, Outcome 13: Depression score

Comparison 7: Misoprostol vs Suction aspiration + Cervical preparation, Outcome 1: Complete Miscarriage

Comparison 7: Misoprostol vs Suction aspiration + Cervical preparation, Outcome 2: Pyrexia

Comparison 8: Misoprostol vs Expectant/ Placebo, Outcome 1: Complete Miscarriage

Comparison 8: Misoprostol vs Expectant/ Placebo, Outcome 2: Composite outcome of death or serious complication

Comparison 8: Misoprostol vs Expectant/ Placebo, Outcome 3: Need for unplanned/emergency surgical procedure

Comparison 8: Misoprostol vs Expectant/ Placebo, Outcome 4: Pain score

Comparison 8: Misoprostol vs Expectant/ Placebo, Outcome 5: Pelvic inflammatory disease, sepsis or endometritis

Comparison 8: Misoprostol vs Expectant/ Placebo, Outcome 6: Change in haemoglobin measurements before and after the miscarriage

Comparison 8: Misoprostol vs Expectant/ Placebo, Outcome 7: Days of bleeding

Comparison 8: Misoprostol vs Expectant/ Placebo, Outcome 8: Mean duration of hospital stay (days)

Comparison 8: Misoprostol vs Expectant/ Placebo, Outcome 9: Re‐admission to hospital

Comparison 8: Misoprostol vs Expectant/ Placebo, Outcome 10: Nausea

Comparison 8: Misoprostol vs Expectant/ Placebo, Outcome 11: Vomiting

Comparison 8: Misoprostol vs Expectant/ Placebo, Outcome 12: Diarrhoea

Comparison 8: Misoprostol vs Expectant/ Placebo, Outcome 13: Pyrexia

Comparison 8: Misoprostol vs Expectant/ Placebo, Outcome 14: Anxiety score

Comparison 8: Misoprostol vs Expectant/ Placebo, Outcome 15: Depression score

Comparison 9: Dilatation & Curettage vs Expectant/ Placebo, Outcome 1: Complete Miscarriage

Comparison 9: Dilatation & Curettage vs Expectant/ Placebo, Outcome 2: Pelvic inflammatory disease, sepsis or endometritis

Comparison 9: Dilatation & Curettage vs Expectant/ Placebo, Outcome 3: Days of bleeding

Comparison 10: Mifepristone + Misoprostol vs Expectant/ Placebo, Outcome 1: Complete Miscarriage

Comparison 10: Mifepristone + Misoprostol vs Expectant/ Placebo, Outcome 2: Composite outcome of death or serious complication

Comparison 10: Mifepristone + Misoprostol vs Expectant/ Placebo, Outcome 3: Need for unplanned/emergency surgical procedure

Comparison 10: Mifepristone + Misoprostol vs Expectant/ Placebo, Outcome 4: Pain score

Comparison 10: Mifepristone + Misoprostol vs Expectant/ Placebo, Outcome 5: Pelvic inflammatory disease, sepsis or endometritis

Comparison 10: Mifepristone + Misoprostol vs Expectant/ Placebo, Outcome 6: Days of bleeding

Comparison 10: Mifepristone + Misoprostol vs Expectant/ Placebo, Outcome 7: Pyrexia
| Medical and surgical management compared with expectant management or placebo for treating missed early miscarriage | |||||||||
| Patient or population: women with missed miscarriage at ≤14 weeks gestation Settings: hospital or other healthcare facility Intervention: multiple interventions (suction aspiration, misoprostol, dilation and curettage, mifepristone plus misoprostol, suction aspiration plus cervical preparation) Comparison (reference): expectant management or placebo Outcome: complete miscarriage | |||||||||
| Intervention | Network evidence | Direct evidence | Indirect evidence | Illustrative comparative risks* (95% CI) for NMA estimate | |||||
| Relative effect | Certainty of the evidence | Relative effect | Certainty of the evidence | Relative effect | Certainty of the evidence | Risk | Risk | Risk difference | |
| Suction aspiration plus cervical preparation | 2.12 (1.41 to 3.20) | ⊕⊕⊖⊖ LOWa | Not reported by included studies | ‐ | 2.12 (1.41 to 3.20) | ⊕⊕⊖⊖ LOWb | 640 per 1000 | 1000 per 1000 | 360 more per 1,000 (from 182 more to 577 more) |
| Suction aspiration | 1.44 (1.29 to 1.62) | ⊕⊕⊖⊖ LOWc | 1.27 (1.08 to 1.48) | ⊕⊕⊕⊖ MODERATEd | 1.72 (1.44 to 2.06) | ⊕⊕⊕⊖ MODERATEf | 640 per 1000 | 922 per 1000 | 282 more per 1,000 (from 186 more to 397 more) |
| Dilation and curettage | 1.49 (1.26 to 1.75) | ⊕⊕⊖⊖ LOWc | 1.25 (1.12 to 1.39) | ⊕⊕⊕⊖ MODERATEe | 1.55 (1.29 to 1.86) | ⊕⊕⊖⊖ LOWb | 640 per 1000 | 954 per 1000 | 314 more per 1,000 (from 166 more to 480 more) |
| Mifepristone plus misoprostol | 1.42 (1.22 to 1.66) | ⊕⊕⊕⊖ MODERATEg | 1.59 (1.01 to 2.51) | ⊕⊕⊕⊖ MODERATEd | 1.40 (1.16 to 1.70) | ⊕⊕⊕⊖ MODERATEf | 640 per 1000 | 909 per 1000 | 269 more per 1,000 (from 141 more to 422 more) |
| Misoprostol | 1.30 (1.16 to 1.46) | ⊕⊕⊖⊖ LOWc | 1.85 (1.35 to 2.55) | ⊕⊕⊕⊖ MODERATEd | 1.14 (0.99 to 1.31) | ⊕⊕⊕⊖ MODERATEf | 640 per 1000 | 832 per 1000 | 192 more per 1,000 (from 102 more to 294 more) |
| *The basis for the assumed risk (e.g. the median control group risk across studies) is provided in footnotes. The corresponding risk (and its 95% confidence interval) is based on the assumed risk in the comparison group and the relative effect of the intervention (and its 95% CI). | |||||||||
| GRADE Working Group grades of evidence | |||||||||
| a Network evidence downgraded ‐2 due to low certainty indirect evidence (no intransitivity, incoherence, or imprecision) b Indirect evidence downgraded ‐2 due to limitations in study design c Network evidence downgraded ‐2 due to moderate certainty direct evidence and incoherence between direct and indirect estimates (no intransitivity, or imprecision) d Direct evidence downgraded ‐1 due to severe unexplained statistical heterogeneity e Direct evidence downgraded ‐1 due to serious imprecision f Indirect evidence downgraded ‐1 due to severe unexplained statistical heterogeneity g Network evidence downgraded ‐1 due to moderate certainty indirect evidence (no intransitivity, incoherence, or imprecision) | |||||||||
| Medical and surgical management compared with expectant management or placebo for treating missed early miscarriage | |||||||||
| Patient or population: women with missed miscarriage at ≤14 weeks gestation Settings: hospital or other healthcare facility Intervention: multiple interventions (suction aspiration, misoprostol, dilation and curettage, mifepristone plus misoprostol, suction aspiration plus cervical preparation) Comparison (reference): expectant management or placebo Outcome: complete miscarriage | |||||||||
| Intervention | Network evidence | Direct evidence | Indirect evidence | Illustrative comparative risks* (95% CI) for NMA estimate | |||||
| Relative effect | Certainty of the evidence | Relative effect | Certainty of the evidence | Relative effect | Certainty of the evidence | Risk | Risk | Risk difference | |
| Suction aspiration plus cervical preparation | Not estimable | ‐ | Not reported by included studies | ‐ | Not estimable | ‐ | Not estimable | Not estimable | Not estimable |
| Suction aspiration | 2.43 (1.69 to 3.49) | ⊕⊕⊕⊖ MODERATEb | 1.88 (1.68 to 2.12) | ⊕⊕⊕⊕ HIGH | 3.35 (1.94 to 5.81) | ⊕⊖⊖⊖ VERY LOWa | 455 per 1000 | 942 per 1000 | 487 more per 1000 (from 402 more to 580 more) |
| Dilation and curettage | 2.07 (1.19 to 3.59) | ⊕⊕⊕⊕ HIGH | Not reported by included studies | ‐ | Not estimable | ‐ | 455 per 1000 | 1000 per 1000 | 545 more per 1000 (from 313 more to 847 more) |
| Mifepristone plus misoprostol | 1.82 (1.28 to 2.58) | ⊕⊕⊕⊖ MODERATEb | 1.25 (1.09 to 1.45) | ⊕⊕⊕⊕ HIGH | 2.40 (1.58 to 3.65) | ⊕⊕⊕⊖ MODERATEc | 455 per 1000 | 828 per 1000 | 373 more per 1000 (from 127 more to 719 more) |
| Misoprostol | 1.67 (1.18 to 2.37) | ⊕⊕⊖⊖ LOWe | 3.18 (1.48 to 6.85) | ⊕⊕⊕⊖ MODERATEd | 1.16 (0.81 to 1.67) | ⊕⊕⊕⊖ MODERATEc | 455 per 1000 | 760 per 1000 | 305 more per 1000 (from 82 more to 623 more) |
| *The basis for the assumed risk (e.g. the median control group risk across studies) is provided in footnotes. The corresponding risk (and its 95% confidence interval) is based on the assumed risk in the comparison group and the relative effect of the intervention (and its 95% CI). | |||||||||
| GRADE Working Group grades of evidence | |||||||||
| a Indirect evidence downgraded ‐3 due to multiple crucial limitations in study design, severe unexplained statistical heterogeneity and imprecision b Network evidence downgraded ‐1 due to high certainty direct evidence and incoherence between direct and indirect estimates (no intransitivity, or imprecision) c Indirect evidence downgraded ‐1 due to severe unexplained statistical heterogeneity d Direct evidence downgraded ‐1 due to severe unexplained statistical heterogeneity e Network evidence downgraded ‐2 due to moderate certainty indirect evidence and incoherence between direct and indirect estimates (no intransitivity, or imprecision) | |||||||||
| Medical and surgical management compared with expectant management or placebo for treating incomplete early miscarriage | |||||||||
| Patient or population: women with incomplete miscarriage at ≤14 weeks gestation Settings: hospital or other healthcare facility Intervention: multiple interventions (suction aspiration, misoprostol, dilation and curettage, mifepristone plus misoprostol, suction aspiration plus cervical preparation) Comparison (reference): expectant management or placebo Outcome: complete miscarriage | |||||||||
| Intervention | Network evidence | Direct evidence | Indirect evidence | Illustrative comparative risks* (95% CI) for NMA estimate | |||||
| Relative effect | Quality of the evidence | Relative effect | Certainty of the evidence | Relative effect | Certainty of the evidence | Risk | Risk | Risk difference | |
| Suction aspiration plus cervical preparation | Not estimable | ‐ | Not reported by included studies | ‐ | Not estimable | ‐ | Not estimable | Not estimable | Not estimable |
| Suction aspiration | 1.19 (1.09 to 1.31) | ⊕⊕⊕⊖ MODERATEc | 1.20 (0.85 to 1.69) | ⊕⊖⊖⊖ VERY LOWa | 1.28 (1.11 to 1.48) | ⊕⊕⊖⊖ LOWb | 767 per 1000 | 913 per 1000 | 146 more per 1000 (from 69 more to 238 more) |
| Dilation and curettage | 1.19 (1.08 to 1.31) | ⊕⊕⊕⊖ MODERATEf | 1.25 (1.12 to 1.39) | ⊕⊕⊕⊖ MODERATEd | 1.15 (1.02 to 1.30) | ⊕⊖⊖⊖ VERY LOWe | 767 per 1000 | 913 per 1000 | 146 more per 1000 (from 61 more to 238 more) |
| Mifepristone plus misoprostol | 1.08 (0.87 to 1.34) | ⊕⊖⊖⊖ VERY LOWh | 1.08 (0.90 to 1.30) | ⊕⊖⊖⊖ VERY LOWg | Not estimable | ‐ | 767 per 1000 | 828 per 1000 | 61 more per 1000 (from 100 fewer to 261 more) |
| Misoprostol | 1.14 (1.03 to 1.25) | ⊕⊕⊕⊖ MODERATEj | 1.04 (0.70 to 1.54) | ⊕⊕⊖⊖ LOWi | 1.12 (1.02 to 1.24) | ⊕⊖⊖⊖ VERY LOWe | 767 per 1000 | 874 per 1000 | 107 more per 1000 (from 23 more to 192 more) |
| *The basis for the assumed risk (e.g. the median control group risk across studies) is provided in footnotes. The corresponding risk (and its 95% confidence interval) is based on the assumed risk in the comparison group and the relative effect of the intervention (and its 95% CI). | |||||||||
| GRADE Working Group grades of evidence | |||||||||
| a Direct evidence downgraded ‐3 due to multiple crucial limitations in study design, severe unexplained statistical heterogeneity and imprecision b Indirect evidence downgraded ‐2 due to serious imprecision c Network evidence downgraded ‐1 due to low certainty indirect evidence upgraded by 1 as it was downgraded for imprecision d Direct evidence downgraded ‐1 due to serious imprecision e Indirect evidence downgraded ‐3 due to multiple crucial limitations in study design, severe unexplained statistical heterogeneity and imprecision f Network evidence downgraded ‐1 due to moderate certainty direct evidence (no intransitivity, incoherence, or imprecision) g Direct evidence downgraded ‐3 due to multiple crucial limitations in study design and imprecision h Network evidence downgraded ‐3 due to very low certainty direct evidence (no intransitivity, incoherence, or imprecision) i Direct evidence downgraded ‐2 due to serious imprecision j Network evidence downgraded ‐1 due to low certainty direct evidence upgraded by 1 as network evidence is precise | |||||||||
| Medical and surgical management compared with expectant management or placebo for treating early miscarriage | |||||||||
| Patient or population: women with missed or incomplete miscarriage at ≤14 weeks gestation Settings: Hospital Intervention: multiple interventions (suction aspiration, misoprostol, dilation plus curettage, mifepristone plus misoprostol, suction aspiration plus cervical preparation) Comparison (reference): expectant management Outcome: composite outcome of death or serious complication | |||||||||
| Intervention | Network evidence | Direct evidence | Indirect evidence | Illustrative comparative risks* (95% CI) for NMA estimate | |||||
| Relative effect | Certainty of the evidence | Relative effect | Certainty of the evidence | Relative effect | Certainty of the evidence | Risk | Risk | Risk difference | |
| Suction aspiration plus cervical preparation | Not reported by included studies | ‐ | Not reported by included studies | ‐ | Not reported by included studies | ‐ | Not estimable | Not estimable | Not estimable |
| Suction aspiration | 0.55 (0.23 to 1.32) | ⊕⊕⊖⊖ LOWc | 0.43 (0.12 to 1.53) | ⊕⊕⊖⊖ LOWa | 0.97 (0.21 to 4.40) | ⊕⊕⊖⊖ LOWb | 19 per 1000 | 10 per 1000 | 9 fewer per 1000 (from 15 fewer to 6 more) |
| Dilation and curettage | 0.43 (0.17 to 1.06) | ⊕⊕⊖⊖ LOWd | Not reported by included studies | ‐ | 0.43 (0.17 to 1.06) | ⊕⊕⊖⊖ LOWb | 19 per 1000 | 8 per 1000 | 11 fewer per 1000 (from 16 fewer to 1 more) |
| Mifepristone plus misoprostol | 0.76 (0.31 to 1.84) | ⊕⊕⊖⊖ LOWc | 0.46 (0.13 to 1.63) | ⊕⊕⊖⊖ LOWa | 1.38 (0.37 to 5.17) | ⊕⊕⊖⊖ LOWb | 19 per 1000 | 14 per 1000 | 5 fewer per 1000 (from 13 fewer to 16 more) |
| Misoprostol | 0.50 (0.22 to 1.15) | ⊕⊕⊖⊖ LOWd | 0.96 (0.06 to 15.08) | ⊕⊕⊖⊖ LOWa | 0.35 (0.13 to 0.97) | ⊕⊕⊖⊖ LOWb | 19 per 1000 | 10 per 1000 | 9 fewer per 1000 (from 15 fewer to 3 more) |
| *The basis for the assumed risk (e.g. the median control group risk across studies) is provided in footnotes. The corresponding risk (and its 95% confidence interval) is based on the assumed risk in the comparison group and the relative effect of the intervention (and its 95% CI). | |||||||||
| GRADE Working Group grades of evidence | |||||||||
| a Direct evidence downgraded ‐2 due to very serious imprecision b Indirect evidence downgraded ‐2 due to very serious imprecision c Network evidence downgraded ‐2 due to low certainty direct evidence (no intransitivity or incoherence) d Network evidence downgraded ‐2 due to low certainty indirect evidence (no intransitivity or incoherence) | |||||||||
| Medical and surgical management compared with expectant management or placebo for treating early miscarriage | |||||||||
| Patient or population: women with a miscarriage at ≤14 weeks gestation Settings: hospital or other healthcare facility Intervention: multiple interventions (suction aspiration, misoprostol, dilation and curettage, mifepristone plus misoprostol, suction aspiration plus cervical preparation) Comparison (reference): expectant management or placebo Outcome: need for unplanned/emergency surgical procedure | |||||||||
| Intervention | Network evidence | Direct evidence | Indirect evidence | Illustrative comparative risks* (95% CI) for NMA estimate | |||||
| Relative effect | Certainty of the evidence | Relative effect | Certainty of the evidence | Relative effect | Certainty of the evidence | Risk | Risk | Risk difference | |
| Suction aspiration plus cervical preparation | Not estimable | ‐ | Not reported by included studies | ‐ | Not estimable | ‐ | Not estimable | Not estimable | Not estimable |
| Suction aspiration | 0.37 (0.22 to 0.65) | ⊕⊕⊕⊖ MODERATEb | 0.51 (0.30 to 0.87) | ⊕⊕⊕⊕ HIGH | 0.13 (0.05 to 0.35) | ⊕⊕⊖⊖ LOWa | 120 per 1000 | 44 per 1000 | 76 fewer per 1000 (from 42 fewer to 94 fewer) |
| Dilation and curettage | 0.80 (0.09 to 7.02) | ⊕⊖⊖⊖ VERY LOWc | Not reported by included studies | ‐ | Not estimable | ‐ | 120 per 1000 | 96 per 1000 | 24 fewer per 1000 (from 109 fewer to 722 more) |
| Mifepristone plus misoprostol | 0.64 (0.33 to 1.23) | ⊕⊕⊖⊖ LOWe | 0.32 (0.11 to 0.90) | ⊕⊕⊕⊖ MODERATEd | 0.91 (0.43 to 1.93) | ⊕⊕⊖⊖ LOWa | 120 per 1000 | 77 per 1000 | 43 less per 1000 (from 80 fewer to 28 more) |
| Misoprostol | 1.04 (0.56 to 1.95) | ⊕⊕⊖⊖ LOWg | 0.67 (0.23 to 1.95) | ⊕⊕⊖⊖ LOWf | 1.28 (0.61 to 2.66) | ⊕⊕⊖⊖ LOWa | 120 per 1000 | 125 per 1000 | 5 more per 1000 (from 53 fewer to 114 more) |
| *The basis for the assumed risk (e.g. the median control group risk across studies) is provided in footnotes. The corresponding risk (and its 95% confidence interval) is based on the assumed risk in the comparison group and the relative effect of the intervention (and its 95% CI). | |||||||||
| GRADE Working Group grades of evidence | |||||||||
| a Indirect evidence downgraded ‐2 due to serious imprecision b Network evidence downgraded ‐1 due to high certainty direct evidence downgraded due to incoherence c Network evidence downgraded ‐1 due to low certainty indirect loop further downgraded due to imprecision d Direct evidence downgraded ‐1 due to imprecision e Network evidence downgraded ‐1 due to moderate certainty direct evidence downgraded due to incoherence f Direct evidence downgraded ‐2 due to serious imprecision g Network evidence downgraded due to low certainty indirect evidence with imprecision but not further downgraded as indirect evidence previously downgraded for imprecision | |||||||||
| Medical and surgical management compared with expectant management or placebo for treating early miscarriage | |||||
| Patient or population: women with a miscarriage at ≤14 weeks gestation Settings: hospital or other healthcare facility Intervention: multiple interventions (suction aspiration, misoprostol, dilation and curettage, mifepristone plus misoprostol, suction aspiration plus cervical preparation) Comparison (reference): expectant management or placebo Outcome: pain scores (visual analogue scale) | |||||
| Intervention | Anticipated absolute effects* (95% CI) | № of participants | Certainty of the evidence | Comments | |
|---|---|---|---|---|---|
| Risk with standard care | Risk with intervention | ||||
| Suction aspiration plus cervical preparation | The mean pain score was 0 | Not reported by included studies | ‐ | ‐ | |
| Suction aspiration | The mean pain score was 0 | Not reported by included studies | ‐ | ‐ | |
| Dilation and curettage | The mean pain score was 0 | Not reported by included studies | ‐ | ‐ | |
| Mifepristone plus misoprostol | The pain score in the mifepristone plus misoprostol group was on average 0.14 higher (from 0.21 lower to 0.5 higher) than in the expectant management or placebo group | 122 | ⊕⊕⊝⊝ | small effect | |
| Misoprostol | The pain score in the misoprostol group was on average 0.33 higher (from 0.08 lower to 0.57 higher) than in the expectant management or placebo group | 262 | ⊕⊕⊝⊝ | small effect | |
| *The risk in the intervention group (and its 95% confidence interval) is based on the assumed risk in the comparison group and the relative effect of the intervention (and its 95% CI). | |||||
| GRADE Working Group grades of evidence | |||||
| a ‐1 as patient reported outcome b ‐1 due to imprecision | |||||
| Medical and surgical management compared with expectant management or placebo for treating early miscarriage | |||||||||
| Patient or population: women with a miscarriage at ≤14 weeks gestation Settings: Hospital or other healthcare facility Intervention: multiple interventions (suction aspiration, misoprostol, dilation and curettage, mifepristone plus misoprostol, suction aspiration plus cervical preparation) Comparison (reference): expectant management or placebo Outcome: pelvic inflammatory disease, sepsis or endometritis | |||||||||
| Intervention | Network evidence | Direct evidence | Indirect evidence | Illustrative comparative risks* (95% CI) for NMA estimate | |||||
| Relative effect | Certainty of the evidence | Relative effect | Certainty of the evidence | Relative effect | Certainty of the evidence | Risk | Risk | Risk difference | |
| Suction aspiration plus cervical preparation | Not estimable | ‐ | Not reported by included studies | ‐ | Not estimable | ‐ | Not estimable | Not estimable | Not estimable |
| Suction aspiration | 1.42 (0.88 to 2.28) | ⊕⊕⊕⊖ MODERATEc | 1.35 (0.76 to 2.41) | ⊕⊕⊕⊖ MODERATEa | 1.55 (0.66 to 3.68) | ⊕⊕⊖⊖ LOWb | 36 per 1000 | 51 per 1000 | 15 more per 1000 (from 4 fewer to 46 more) |
| Dilation and curettage | 1.85 (1.05 to 3.25) | ⊕⊖⊖⊖ VERY LOWf | 3.30 (0.82 to 13.28) | ⊕⊕⊖⊖ LOWd | 1.65 (0.89 to 3.06) | ⊕⊖⊖⊖ VERY LOWe | 36 per 1000 | 67 per 1000 | 31 more 1000 (from 2 more to 81 more) |
| Mifepristone plus misoprostol | 0.90 (0.48 to 1.68) | ⊕⊕⊖⊖ LOWg | 0.73 (0.30 to 1.80) | ⊕⊕⊖⊖ LOWd | 1.11 (0.47 to 2.64) | ⊕⊕⊖⊖ LOWb | 36 per 1000 | 32 per 1000 | 4 fewer per 1000 (from 19 fewer to 25 more) |
| Misoprostol | 1.08 (0.62 to 1.88) | ⊕⊕⊕⊖ MODERATEc | 1.84 (0.35 to 9.68) | ⊕⊕⊖⊖ LOWd | 1.10 (0.56 to 2.16) | ⊕⊕⊕⊖ MODERATEh | 36 per 1000 | 39 per 1000 | 3 more per 1000 (from 14 fewer to 32 more) |
| *The basis for the assumed risk (e.g. the median control group risk across studies) is provided in footnotes. The corresponding risk (and its 95% confidence interval) is based on the assumed risk in the comparison group and the relative effect of the intervention (and its 95% CI). | |||||||||
| GRADE Working Group grades of evidence | |||||||||
| a Direct evidence downgraded ‐1 due to imprecision b Indirect evidence downgraded ‐2 due to serious imprecision c Network evidence downgraded ‐1 due to moderate certainty direct evidence not further downgraded due to imprecision as direct evidence previously downgraded for imprecision d Direct evidence downgraded ‐2 due to serious imprecision e Indirect evidence downgraded ‐3 due to serious design limitations and imprecision in direct evidence f Network evidence downgraded ‐3 due to very low certainty indirect evidence, further downgraded ‐1 for incoherence but upgraded +1 as network is precise g Network evidence downgraded ‐2 due to low certainty direct evidence, not further downgraded due to imprecision as direct evidence previously downgraded for imprecision h Indirect evidence downgraded ‐1 due to imprecision in direct evidence | |||||||||
| Medical and surgical management compared with expectant management or placebo for treating early miscarriage | |||||||||
| Patient or population: women with a miscarriage at ≤14 weeks gestation Settings: hospital or other healthcare facility Intervention: multiple interventions (suction aspiration, misoprostol, dilation and curettage, mifepristone plus misoprostol, suction aspiration plus cervical preparation) Comparison (reference): expectant management or placebo Outcome: days of bleeding | |||||||||
| Intervention | Network evidence | Direct evidence | Indirect evidence | Illustrative comparative risks* (95% CI) for NMA estimate | |||||
| Mean difference | Certainty of the evidence | Mean difference | Certainty of the evidence | Mean difference | Certainty of the evidence | Risk | Risk | Risk difference | |
| Suction aspiration plus cervical preparation | Not estimable | ‐ | Not reported by included studies | ‐ | Not estimable | ‐ | Not estimable | Not estimable | Not estimable |
| Suction aspiration | ‐2.00 (‐3.01 to ‐0.99) | ⊕⊖⊖⊖ VERY LOWc | ‐2.75 (‐4.08 to ‐1.42) | ⊕⊕⊖⊖ LOWa | ‐0.73 (‐2.12 to 0.66) | ⊕⊖⊖⊖ VERY LOWb | 10 days | 8 days | 2 days less (from 0.99 days less to 3.01 days less) |
| Dilation and curettage | ‐1.96 (‐3.48 to ‐0.45) | ⊕⊕⊖⊖ LOWf | ‐1.26 (‐2.27 to ‐0.25) | ⊕⊕⊖⊖ LOWd | ‐2.47 (‐4.47 to ‐0.46) | ⊕⊖⊖⊖ VERY LOWe | 10 days | 8.04 days | 1.96 days less (from 0.45 days less to 3.48 days less) |
| Mifepristone plus misoprostol | ‐0.14 (‐1.71 to 1.43) | ⊕⊖⊖⊖ VERY LOWh | 0.70 (‐0.43 to 1.83) | ⊕⊖⊖⊖ VERY LOWg | ‐0.77 (‐2.83 to 1.30) | ⊕⊖⊖⊖ VERY LOWb | 10 days | 9.86 days | 0.14 days less (from 1.71 days less to 1.43 days more) |
| Misoprostol | ‐0.47 (‐1.53 to 0.60) | ⊕⊖⊖⊖ VERY LOWk | 0.32 (‐2.19 to 2.84) | ⊕⊖⊖⊖ VERY LOWi | ‐0.96 (‐2.27 to 0.35) | ⊕⊕⊖⊖ LOWj | 10 days | 9.53 days | 0.47 days less (from 1.53 days less to 0.60 days more) |
| *The basis for the assumed risk (e.g. the median control group risk across studies) is provided in footnotes. The corresponding risk (and its 95% confidence interval) is based on the assumed risk in the comparison group and the relative effect of the intervention (and its 95% CI). | |||||||||
| GRADE Working Group grades of evidence | |||||||||
| a Direct evidence downgraded ‐2 due to patient reported outcome and significant heterogeneity b Indirect evidence downgraded ‐4 due to patient reported outcome, significant heterogeneity and serious imprecision c Network evidence downgraded ‐4 due to low certainty direct evidence, further downgraded due to incoherence and not upgraded as direct grade not downgraded for imprecision d Direct evidence downgraded ‐2 due to patient reported outcome and imprecision e Indirect evidence downgraded ‐4 due to very low certainty direct evidence which was due to patient reported outcome, moderate design limitations and serious imprecision f Network evidence downgraded ‐2 due to low certainty direct evidence, further downgraded ‐1 for incoherence but upgraded +1 as network is precise and direct evidence was previously downgraded for imprecision g Direct evidence downgraded ‐3 due to patient reported outcome and serious imprecision h Network evidence downgraded ‐5 due to very low certainty direct evidence, further downgraded due to incoherence but not even further downgraded due to imprecision as direct evidence previously downgraded for imprecision i Direct evidence downgraded ‐4 due to patient reported outcome, significant heterogeneity and serious imprecision j Indirect evidence downgraded ‐2 due to patient reported outcome and significant heterogeneity k Network evidence downgraded ‐3 due to low certainty indirect evidence downgraded ‐1 due to imprecision | |||||||||
| Medical and surgical management compared with expectant management or placebo for treating early miscarriage | ||||
| Patient or population: women with a miscarriage at ≤14 weeks gestation Settings: hospital or other healthcare facility Intervention: multiple interventions (suction aspiration, misoprostol, dilation and curettage, mifepristone plus misoprostol, suction aspiration plus cervical preparation) Comparison (reference): expectant management or placebo Outcome: women's views/ satisfaction | ||||
| Intervention | Narrative synthesis | № of participants | Certainty of the evidence | Comments |
|---|---|---|---|---|
| Suction aspiration plus cervical preparation | Not reported by included studies | (0 RCTs) | ‐ | |
| Suction aspiration | 2 trials described 92 out of 96 women (98.5%) as being satisfied with suction aspiration compared to 97 out of 99 women (98.0%) for expectant management or placebo. 1 trial used a 10 point numerical scale and found suction aspiration had a satisfaction score of 7.57 from 175 women and expectant management or placebo also had a 7.57 score from 177 women. | 547 | ⊕⊕⊕⊝ | |
| Dilatation and curettage | Not reported by included studies | (0 RCTs) | ‐ | |
| Mifepristone plus misoprostol | 1 trial used a visual analogue scale and found Mifepristone plus misoprostol had a score of 28.6 (SD 24.8) from 60 women compared to 25.2 (SD 25.6) from 62 women for expectant management or placebo | 122 | ⊕⊝⊝⊝ | |
| Misoprostol | 1 trial used a visual analogue scale and found misoprostol had a score of 8.9 (+/‐ 1.3) compared to 8.7 (+/‐ 1.5) for expectant management or placebo with 52 women in each arm. 1 trial described 14 out of 16 (87.5%) women as being satisfied with misoprostol compared to 12 out of 16 (75%) women as being satisfied with expectant management or placebo | 136 | ⊕⊕⊝⊝ | |
| GRADE Working Group grades of evidence | ||||
| a‐1 no meta‐analysis possible, narrative synthesis was conducted, estimates are not precise b ‐1 due to design limitations c ‐1 due to imprecision | ||||
| Outcome or subgroup title | No. of studies | No. of participants | Statistical method | Effect size |
| 1.1 Complete Miscarriage Show forest plot | 23 | Risk Ratio (IV, Random, 95% CI) | Subtotals only | |
| 1.1.1 Missed miscarriage | 3 | 308 | Risk Ratio (IV, Random, 95% CI) | 1.51 [1.14, 2.01] |
| 1.1.2 Incomplete miscarriage | 14 | 3474 | Risk Ratio (IV, Random, 95% CI) | 1.03 [1.01, 1.05] |
| 1.1.3 Mixed population | 6 | 1706 | Risk Ratio (IV, Random, 95% CI) | 1.19 [1.06, 1.32] |
| 1.2 Composite outcome of death or serious complication Show forest plot | 9 | 2146 | Risk Ratio (IV, Random, 95% CI) | 1.53 [0.45, 5.16] |
| 1.3 Need for unplanned/emergency surgical procedure Show forest plot | 9 | 1078 | Risk Ratio (IV, Random, 95% CI) | 0.19 [0.10, 0.37] |
| 1.4 Pain score Show forest plot | 8 | 2857 | Std. Mean Difference (IV, Random, 95% CI) | 0.08 [‐0.35, 0.51] |
| 1.5 Pelvic inflammatory disease, sepsis or endometritis Show forest plot | 12 | 2989 | Risk Ratio (IV, Random, 95% CI) | 1.27 [0.67, 2.41] |
| 1.6 Change in haemoglobin measurements before and after the miscarriage Show forest plot | 7 | 2706 | Mean Difference (IV, Random, 95% CI) | ‐0.17 [‐0.29, ‐0.05] |
| 1.7 Days of bleeding Show forest plot | 7 | Mean Difference (IV, Random, 95% CI) | Subtotals only | |
| 1.8 Cervical tear Show forest plot | 5 | 1252 | Risk Ratio (IV, Random, 95% CI) | 7.18 [0.84, 61.00] |
| 1.9 Mean duration of hospital stay (days) Show forest plot | 1 | 635 | Mean Difference (IV, Random, 95% CI) | ‐0.40 [‐0.68, ‐0.12] |
| 1.10 Re‐admission to hospital Show forest plot | 2 | 554 | Risk Ratio (IV, Random, 95% CI) | 0.77 [0.27, 2.21] |
| 1.11 Nausea Show forest plot | 13 | 3605 | Risk Ratio (IV, Random, 95% CI) | 0.52 [0.35, 0.76] |
| 1.12 Vomiting Show forest plot | 13 | 3447 | Risk Ratio (IV, Random, 95% CI) | 0.50 [0.38, 0.68] |
| 1.13 Diarrhoea Show forest plot | 9 | 1769 | Risk Ratio (IV, Random, 95% CI) | 0.39 [0.26, 0.60] |
| 1.14 Pyrexia Show forest plot | 15 | 4129 | Risk Ratio (IV, Random, 95% CI) | 0.37 [0.22, 0.61] |
| 1.15 Anxiety score Show forest plot | 2 | 719 | Std. Mean Difference (IV, Random, 95% CI) | ‐0.08 [‐0.24, 0.09] |
| 1.16 Depression score Show forest plot | 2 | 719 | Std. Mean Difference (IV, Random, 95% CI) | ‐0.17 [‐0.46, 0.12] |
| Outcome or subgroup title | No. of studies | No. of participants | Statistical method | Effect size |
| 2.1 Complete Miscarriage Show forest plot | 2 | Risk Ratio (IV, Random, 95% CI) | Subtotals only | |
| 2.1.1 Missed miscarriage | 1 | 618 | Risk Ratio (IV, Random, 95% CI) | 1.50 [1.37, 1.64] |
| 2.1.2 Mixed population | 1 | 98 | Risk Ratio (IV, Random, 95% CI) | 1.11 [1.01, 1.23] |
| 2.2 Composite outcome of death or serious complication Show forest plot | 1 | 618 | Risk Ratio (IV, Random, 95% CI) | 0.14 [0.01, 2.74] |
| 2.3 Need for unplanned/emergency surgical procedure Show forest plot | 1 | 98 | Risk Ratio (IV, Random, 95% CI) | 1.00 [0.06, 15.54] |
| 2.4 Pelvic inflammatory disease, sepsis or endometritis Show forest plot | 2 | 716 | Risk Ratio (IV, Random, 95% CI) | 2.33 [0.47, 11.44] |
| 2.5 Re‐admission to hospital Show forest plot | 1 | 98 | Risk Ratio (IV, Random, 95% CI) | 0.14 [0.01, 2.69] |
| Outcome or subgroup title | No. of studies | No. of participants | Statistical method | Effect size |
| 3.1 Complete Miscarriage Show forest plot | 5 | Risk Ratio (IV, Random, 95% CI) | Subtotals only | |
| 3.1.1 Incomplete miscarriage | 4 | 1432 | Risk Ratio (IV, Random, 95% CI) | 1.02 [0.98, 1.06] |
| 3.1.2 Mixed population | 1 | 90 | Risk Ratio (IV, Random, 95% CI) | 1.05 [0.94, 1.17] |
| 3.2 Composite outcome of death or serious complication Show forest plot | 5 | 1521 | Risk Ratio (IV, Random, 95% CI) | 1.27 [0.80, 2.02] |
| 3.3 Need for unplanned/emergency surgical procedure Show forest plot | 2 | 693 | Risk Ratio (IV, Random, 95% CI) | 0.33 [0.01, 8.07] |
| 3.4 Pelvic inflammatory disease, sepsis or endometritis Show forest plot | 3 | 822 | Risk Ratio (IV, Random, 95% CI) | 0.77 [0.53, 1.11] |
| 3.5 Mean volumes of blood loss (millilitres) Show forest plot | 2 | 451 | Mean Difference (IV, Random, 95% CI) | ‐11.44 [‐21.49, ‐1.40] |
| 3.6 Change in haemoglobin measurements before and after the miscarriage Show forest plot | 2 | 370 | Mean Difference (IV, Random, 95% CI) | ‐0.41 [‐0.68, ‐0.14] |
| 3.7 Days of bleeding Show forest plot | 1 | 270 | Mean Difference (IV, Random, 95% CI) | ‐0.30 [‐1.30, 0.70] |
| 3.8 Cervical tear Show forest plot | 2 | 558 | Risk Ratio (IV, Random, 95% CI) | 0.49 [0.20, 1.18] |
| 3.9 Mean duration of hospital stay (days) Show forest plot | 3 | 220 | Mean Difference (IV, Random, 95% CI) | ‐0.56 [‐0.89, ‐0.23] |
| 3.10 Re‐admission to hospital Show forest plot | 2 | 1042 | Risk Ratio (IV, Random, 95% CI) | 1.61 [0.62, 4.16] |
| 3.11 Vomiting Show forest plot | 1 | 599 | Risk Ratio (IV, Random, 95% CI) | 2.31 [0.60, 8.85] |
| 3.12 Pyrexia Show forest plot | 3 | 1157 | Risk Ratio (IV, Random, 95% CI) | 1.31 [0.85, 2.02] |
| Outcome or subgroup title | No. of studies | No. of participants | Statistical method | Effect size |
| 4.1 Complete Miscarriage Show forest plot | 7 | Risk Ratio (IV, Random, 95% CI) | Subtotals only | |
| 4.1.1 Missed miscarriage | 1 | 616 | Risk Ratio (IV, Random, 95% CI) | 1.88 [1.68, 2.12] |
| 4.1.2 Incomplete miscarriage | 2 | 300 | Risk Ratio (IV, Random, 95% CI) | 1.20 [0.85, 1.69] |
| 4.1.3 Mixed population | 4 | 776 | Risk Ratio (IV, Random, 95% CI) | 1.18 [1.11, 1.25] |
| 4.2 Composite outcome of death or serious complication Show forest plot | 5 | 1485 | Risk Ratio (IV, Random, 95% CI) | 0.43 [0.12, 1.53] |
| 4.3 Need for unplanned/emergency surgical procedure Show forest plot | 4 | 842 | Risk Ratio (IV, Random, 95% CI) | 0.51 [0.30, 0.87] |
| 4.4 Pelvic inflammatory disease, sepsis or endometritis Show forest plot | 8 | 1725 | Risk Ratio (IV, Random, 95% CI) | 1.35 [0.76, 2.41] |
| 4.5 Mean volumes of blood loss (millilitres) Show forest plot | 1 | 352 | Mean Difference (IV, Random, 95% CI) | ‐23.00 [‐40.41, ‐5.59] |
| 4.6 Change in haemoglobin measurements before and after the miscarriage Show forest plot | 3 | 603 | Mean Difference (IV, Random, 95% CI) | 0.18 [0.10, 0.25] |
| 4.7 Days of bleeding Show forest plot | 4 | Mean Difference (IV, Random, 95% CI) | Subtotals only | |
| 4.8 Cervical tear Show forest plot | 2 | 492 | Risk Ratio (IV, Random, 95% CI) | Not estimable |
| 4.9 Mean duration of hospital stay (days) Show forest plot | 1 | 140 | Mean Difference (IV, Random, 95% CI) | 0.99 [0.74, 1.24] |
| 4.10 Re‐admission to hospital Show forest plot | 2 | 463 | Risk Ratio (IV, Random, 95% CI) | 0.72 [0.15, 3.41] |
| 4.11 Vomiting Show forest plot | 1 | 111 | Risk Ratio (IV, Random, 95% CI) | 0.82 [0.19, 3.50] |
| 4.12 Diarrhoea Show forest plot | 1 | 111 | Risk Ratio (IV, Random, 95% CI) | 1.82 [0.71, 4.67] |
| 4.13 Pyrexia Show forest plot | 1 | 111 | Risk Ratio (IV, Random, 95% CI) | 3.28 [0.69, 15.57] |
| 4.14 Anxiety score Show forest plot | 1 | 111 | Std. Mean Difference (IV, Random, 95% CI) | ‐0.12 [‐0.49, 0.26] |
| 4.15 Depression score Show forest plot | 1 | 111 | Std. Mean Difference (IV, Random, 95% CI) | ‐0.29 [‐0.67, 0.08] |
| Outcome or subgroup title | No. of studies | No. of participants | Statistical method | Effect size |
| 5.1 Complete Miscarriage Show forest plot | 7 | Risk Ratio (IV, Random, 95% CI) | Subtotals only | |
| 5.1.1 Missed miscarriage | 7 | 1812 | Risk Ratio (IV, Random, 95% CI) | 0.87 [0.79, 0.97] |
| 5.2 Composite outcome of death or serious complication Show forest plot | 7 | 1822 | Risk Ratio (IV, Random, 95% CI) | 0.50 [0.20, 1.25] |
| 5.3 Need for unplanned/emergency surgical procedure Show forest plot | 6 | 1527 | Risk Ratio (IV, Random, 95% CI) | 1.55 [1.22, 1.96] |
| 5.4 Pelvic inflammatory disease, sepsis or endometritis Show forest plot | 5 | 1617 | Risk Ratio (IV, Random, 95% CI) | 1.02 [0.54, 1.92] |
| 5.5 Change in haemoglobin measurements before and after the miscarriage Show forest plot | 1 | 90 | Mean Difference (IV, Random, 95% CI) | 0.02 [‐0.18, 0.22] |
| 5.6 Days of bleeding Show forest plot | 2 | Mean Difference (IV, Random, 95% CI) | Subtotals only | |
| 5.7 Re‐admission to hospital Show forest plot | 1 | 344 | Risk Ratio (IV, Random, 95% CI) | 2.30 [1.48, 3.58] |
| 5.8 Nausea Show forest plot | 2 | 570 | Risk Ratio (IV, Random, 95% CI) | 0.74 [0.39, 1.39] |
| 5.9 Vomiting Show forest plot | 1 | 300 | Risk Ratio (IV, Random, 95% CI) | 0.57 [0.36, 0.90] |
| 5.10 Diarrhoea Show forest plot | 2 | 570 | Risk Ratio (IV, Random, 95% CI) | 1.09 [0.83, 1.44] |
| 5.11 Pyrexia Show forest plot | 4 | 685 | Risk Ratio (IV, Random, 95% CI) | 0.74 [0.34, 1.62] |
| Outcome or subgroup title | No. of studies | No. of participants | Statistical method | Effect size |
| 6.1 Complete Miscarriage Show forest plot | 4 | Risk Ratio (IV, Random, 95% CI) | Subtotals only | |
| 6.1.1 Missed miscarriage | 1 | 107 | Risk Ratio (IV, Random, 95% CI) | 0.81 [0.71, 0.93] |
| 6.1.2 Incomplete miscarriage | 1 | 94 | Risk Ratio (IV, Random, 95% CI) | 0.92 [0.83, 1.01] |
| 6.1.3 Mixed population | 2 | 154 | Risk Ratio (IV, Random, 95% CI) | 0.32 [0.07, 1.47] |
| 6.2 Composite outcome of death or serious complication Show forest plot | 2 | 157 | Risk Ratio (IV, Random, 95% CI) | 1.26 [0.54, 2.97] |
| 6.3 Need for unplanned/emergency surgical procedure Show forest plot | 1 | 94 | Risk Ratio (IV, Random, 95% CI) | Not estimable |
| 6.4 Pain score Show forest plot | 1 | 94 | Std. Mean Difference (IV, Random, 95% CI) | 0.51 [0.10, 0.92] |
| 6.5 Pelvic inflammatory disease, sepsis or endometritis Show forest plot | 2 | 201 | Risk Ratio (IV, Random, 95% CI) | 2.12 [0.20, 22.64] |
| 6.6 Mean volumes of blood loss (millilitres) Show forest plot | 1 | 104 | Mean Difference (IV, Random, 95% CI) | 22.30 [4.45, 40.15] |
| 6.7 Days of bleeding Show forest plot | 1 | 94 | Mean Difference (IV, Random, 95% CI) | 2.60 [1.27, 3.93] |
| 6.8 Cervical tear Show forest plot | 1 | 107 | Risk Ratio (IV, Random, 95% CI) | Not estimable |
| 6.9 Re‐admission to hospital Show forest plot | 1 | 107 | Risk Ratio (IV, Random, 95% CI) | 3.17 [0.13, 76.11] |
| 6.10 Vomiting Show forest plot | 1 | 94 | Risk Ratio (IV, Random, 95% CI) | 0.33 [0.01, 7.98] |
| 6.11 Nausea Show forest plot | 1 | 94 | Risk Ratio (IV, Random, 95% CI) | 0.33 [0.01, 7.98] |
| 6.12 Diarrhoea Show forest plot | 1 | 94 | Risk Ratio (IV, Random, 95% CI) | 3.00 [0.13, 71.82] |
| 6.13 Depression score Show forest plot | 1 | 215 | Std. Mean Difference (IV, Random, 95% CI) | ‐0.09 [‐0.36, 0.18] |
| Outcome or subgroup title | No. of studies | No. of participants | Statistical method | Effect size |
| 7.1 Complete Miscarriage Show forest plot | 1 | Risk Ratio (IV, Random, 95% CI) | Subtotals only | |
| 7.2 Pyrexia Show forest plot | 1 | 200 | Risk Ratio (IV, Random, 95% CI) | 2.50 [0.81, 7.71] |
| Outcome or subgroup title | No. of studies | No. of participants | Statistical method | Effect size |
| 8.1 Complete Miscarriage Show forest plot | 10 | Risk Ratio (IV, Random, 95% CI) | Subtotals only | |
| 8.1.1 Missed miscarriage | 4 | 322 | Risk Ratio (IV, Random, 95% CI) | 3.18 [1.48, 6.85] |
| 8.1.2 Incomplete miscarriage | 2 | 108 | Risk Ratio (IV, Random, 95% CI) | 1.91 [0.44, 8.20] |
| 8.1.3 Mixed population | 4 | 408 | Risk Ratio (IV, Random, 95% CI) | 1.45 [0.97, 2.16] |
| 8.2 Composite outcome of death or serious complication Show forest plot | 6 | 548 | Risk Ratio (IV, Random, 95% CI) | 0.96 [0.06, 15.08] |
| 8.3 Need for unplanned/emergency surgical procedure Show forest plot | 5 | 437 | Risk Ratio (IV, Random, 95% CI) | 0.67 [0.23, 1.95] |
| 8.4 Pain score Show forest plot | 3 | 262 | Std. Mean Difference (IV, Random, 95% CI) | 0.33 [0.08, 0.57] |
| 8.5 Pelvic inflammatory disease, sepsis or endometritis Show forest plot | 6 | 615 | Risk Ratio (IV, Random, 95% CI) | 1.84 [0.35, 9.68] |
| 8.6 Change in haemoglobin measurements before and after the miscarriage Show forest plot | 2 | 167 | Mean Difference (IV, Random, 95% CI) | 0.15 [‐0.21, 0.52] |
| 8.7 Days of bleeding Show forest plot | 3 | Mean Difference (IV, Random, 95% CI) | Subtotals only | |
| 8.8 Mean duration of hospital stay (days) Show forest plot | 1 | 184 | Mean Difference (IV, Random, 95% CI) | ‐0.10 [‐0.19, ‐0.01] |
| 8.9 Re‐admission to hospital Show forest plot | 3 | 335 | Risk Ratio (IV, Random, 95% CI) | 1.25 [0.46, 3.35] |
| 8.10 Nausea Show forest plot | 5 | 389 | Risk Ratio (IV, Random, 95% CI) | 1.15 [0.93, 1.42] |
| 8.11 Vomiting Show forest plot | 6 | 506 | Risk Ratio (IV, Random, 95% CI) | 1.37 [0.75, 2.52] |
| 8.12 Diarrhoea Show forest plot | 7 | 560 | Risk Ratio (IV, Random, 95% CI) | 1.69 [1.05, 2.73] |
| 8.13 Pyrexia Show forest plot | 3 | 275 | Risk Ratio (IV, Random, 95% CI) | 4.03 [1.16, 13.97] |
| 8.14 Anxiety score Show forest plot | 1 | 117 | Std. Mean Difference (IV, Random, 95% CI) | ‐0.14 [‐0.51, 0.22] |
| 8.15 Depression score Show forest plot | 1 | 117 | Std. Mean Difference (IV, Random, 95% CI) | 0.08 [‐0.29, 0.44] |
| Outcome or subgroup title | No. of studies | No. of participants | Statistical method | Effect size |
| 9.1 Complete Miscarriage Show forest plot | 1 | Risk Ratio (IV, Random, 95% CI) | Subtotals only | |
| 9.1.1 Incomplete miscarriage | 1 | 155 | Risk Ratio (IV, Random, 95% CI) | 1.25 [1.12, 1.39] |
| 9.2 Pelvic inflammatory disease, sepsis or endometritis Show forest plot | 1 | 155 | Risk Ratio (IV, Random, 95% CI) | 3.30 [0.82, 13.28] |
| 9.3 Days of bleeding Show forest plot | 1 | 155 | Mean Difference (IV, Random, 95% CI) | ‐1.26 [‐2.27, ‐0.25] |
| Outcome or subgroup title | No. of studies | No. of participants | Statistical method | Effect size |
| 10.1 Complete Miscarriage Show forest plot | 3 | Risk Ratio (IV, Random, 95% CI) | Subtotals only | |
| 10.1.1 Missed miscarriage | 1 | 614 | Risk Ratio (IV, Random, 95% CI) | 1.25 [1.09, 1.45] |
| 10.1.2 Incomplete miscarriage | 1 | 122 | Risk Ratio (IV, Random, 95% CI) | 1.08 [0.90, 1.30] |
| 10.1.3 Mixed population | 1 | 174 | Risk Ratio (IV, Random, 95% CI) | 3.44 [2.31, 5.11] |
| 10.2 Composite outcome of death or serious complication Show forest plot | 2 | 788 | Risk Ratio (IV, Random, 95% CI) | 0.43 [0.11, 1.63] |
| 10.3 Need for unplanned/emergency surgical procedure Show forest plot | 2 | 296 | Risk Ratio (IV, Random, 95% CI) | 0.32 [0.11, 0.90] |
| 10.4 Pain score Show forest plot | 1 | 122 | Std. Mean Difference (IV, Random, 95% CI) | 0.14 [‐0.21, 0.50] |
| 10.5 Pelvic inflammatory disease, sepsis or endometritis Show forest plot | 2 | 736 | Risk Ratio (IV, Random, 95% CI) | 0.73 [0.30, 1.80] |
| 10.6 Days of bleeding Show forest plot | 1 | 122 | Mean Difference (IV, Random, 95% CI) | 0.70 [‐0.43, 1.83] |
| 10.7 Pyrexia Show forest plot | 1 | 174 | Risk Ratio (IV, Random, 95% CI) | 0.32 [0.01, 7.71] |